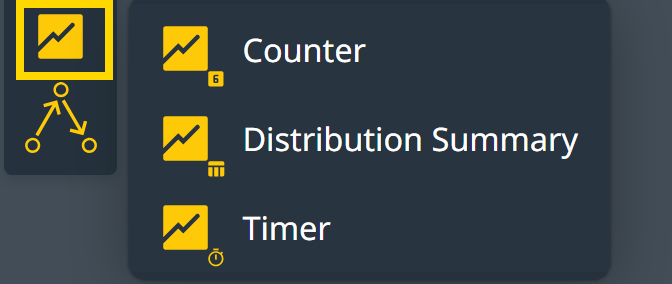
Introduction #
Flows are automated pathways an application follows in response to specific triggers or events. They represent a logical sequence of steps to achieve a particular outcome within an application. Each flow can contain various elements, such as triggers, conditions, activities, and loops, that dictate how the application should respond under certain circumstances.
How Flows Define App Behavior
- Triggers: Flows begin with triggers. These triggers can be a schedule (happening at a specified time or interval), a webhook (initiated by an exposed API endpoint front-end or other backend call), or an event (occurring due to user actions or system conditions).
- Events: Flows can be designed to respond to or send events, allowing for a sequence of flows to be executed.
- Activities: Various activities can be defined within a flow to manipulate data. These can include creating, changing, or committing objects in a database, creating transient objects in the system memory, performing list operations, or handling variables and responding to requests on exposed API endpoints.
Flows in Wizzdi Cloud can be tested against test data. Users can examine the data state at each stage of the flow.
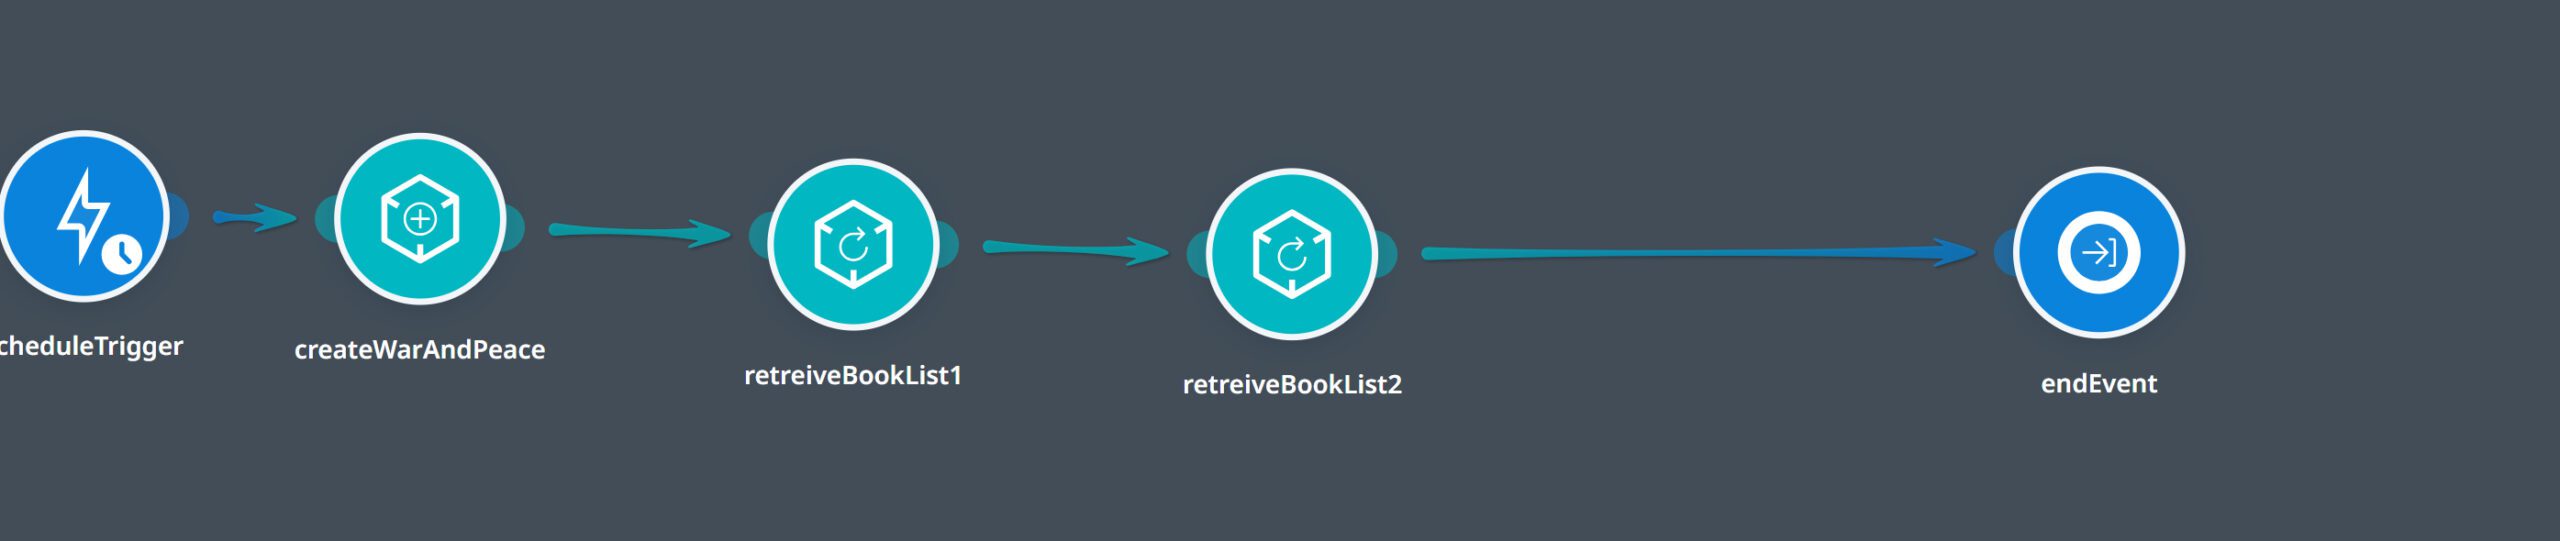
Flows in Wizzdi Cloud
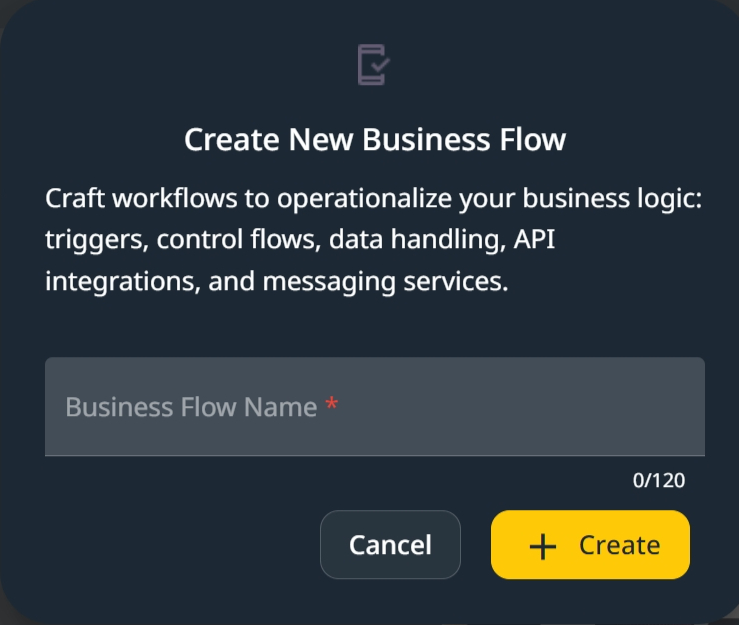
To add a flow to an App, click on flows and then click on ‘+ Add Flow.’

Flows How to #
Create a Flow #
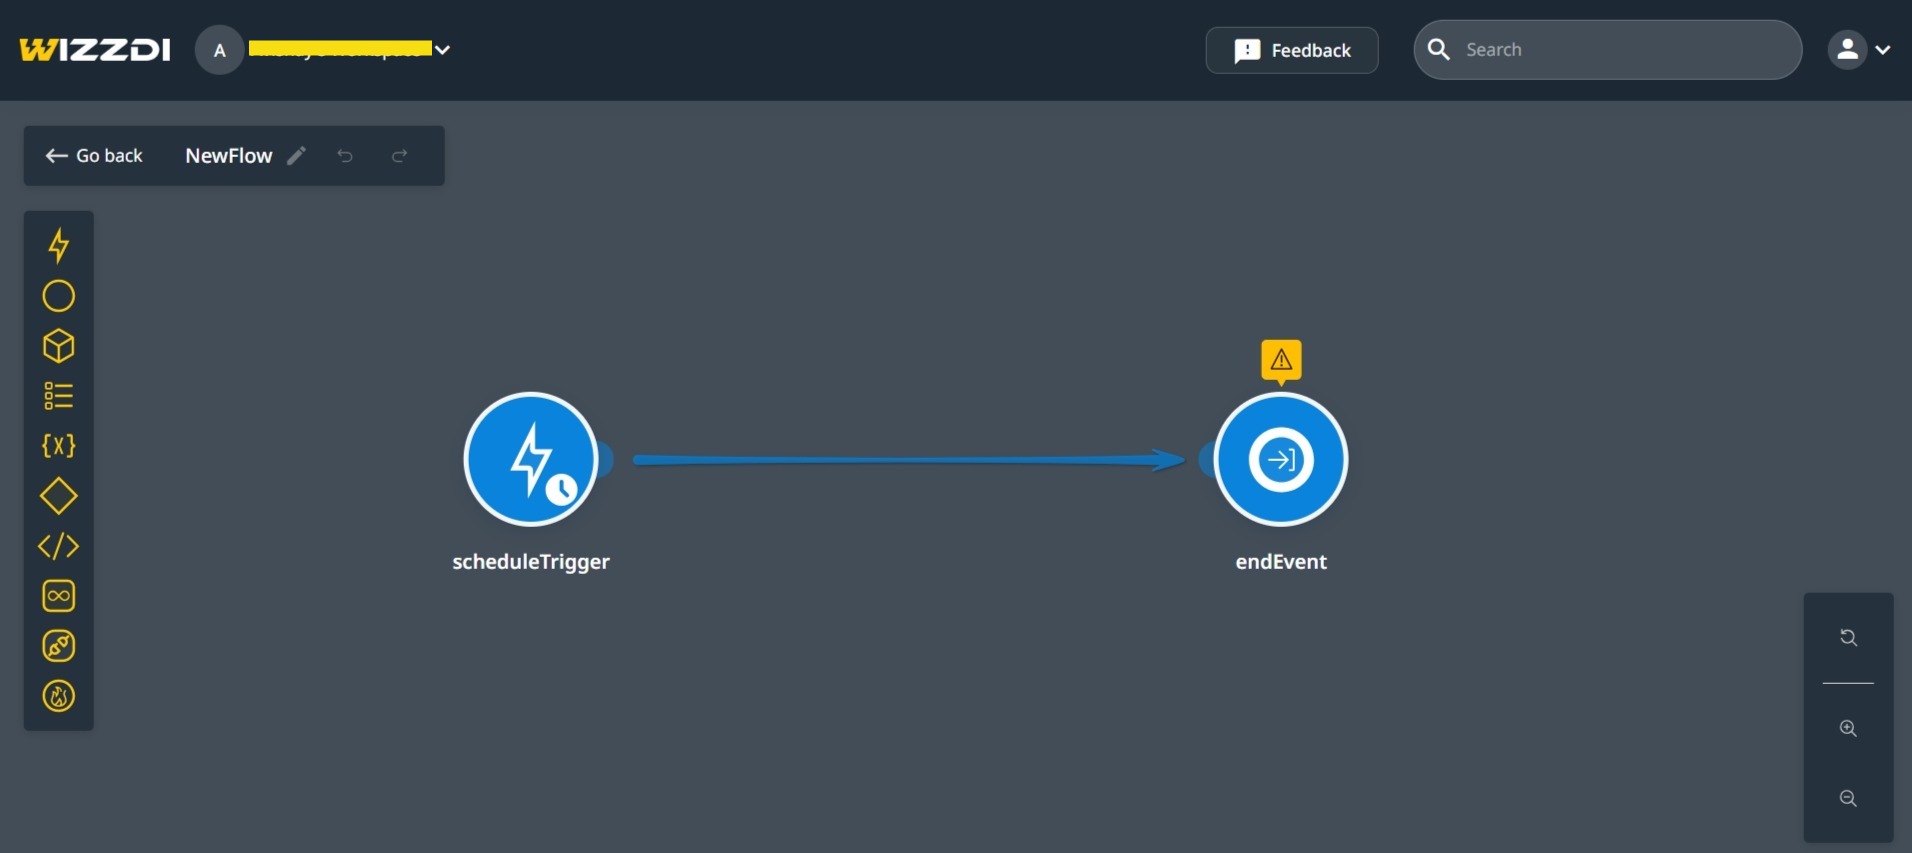
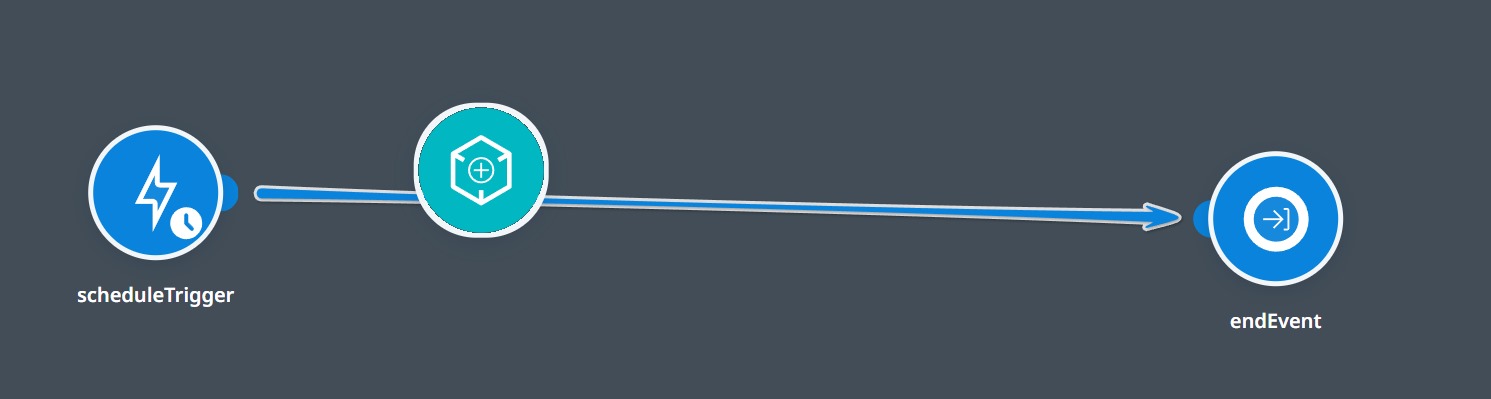
Once the flow is created, the screen below is opened:
In a flow diagram, lines connecting activities represent the direction and progression of actions within the flow. Each activity represents a discrete step or task in the overall process. When lines link activities, it indicates the sequence in which these tasks are executed and how control passes from one activity to the next.
Here’s how the lines and icons depict the flow of action:
- Start Point: The flow typically begins at a start point, represented by a lightning bolt for a trigger. This indicates where the flow initiates.
- Directional Lines: Lines that extend from the start point of one activity to another are usually arrows. These arrows show the direction of the workflow. The flow of action follows the direction of these arrows, moving from one activity to the next.
- Activity Icons: Each step in the process is represented by an icon or symbol that denotes the type of activity.
- Sequential Flow: When an arrow connects one activity directly to another, it indicates that the second activity will commence immediately after the first one is completed. This linear sequence shows a clear start and end point for each activity.
- Branching and Decision Points: Some lines may split into two or more paths, signifying a decision point where the flow can branch off based on certain conditions. Each branch will lead to different activities, showing conditional paths of action.
- Convergence Points: Conversely, lines from different activities may converge into a single line, indicating that multiple activities may need to be completed before moving on to the next step in the flow.
- Loops: Loops in the flow diagram allow for repeating a sequence of activities until a specific condition is met.
- End Point: The flow of action concludes at an endpoint, represented by the endEvent icon; this indicates the completion of the process or that the flow has reached a state where no further action is taken. The endEvent can include an Object returned by the flow, flows can return void too, indicating that it returns nothing. This can be, for instance, return the response in a webhook. All lines must converge before the flow ends.
Technical Note: When the app is committed, a flow is converted to a Java class. In Wizzdi Cloud, committing includes compilation.
Flow Diagram Tools #
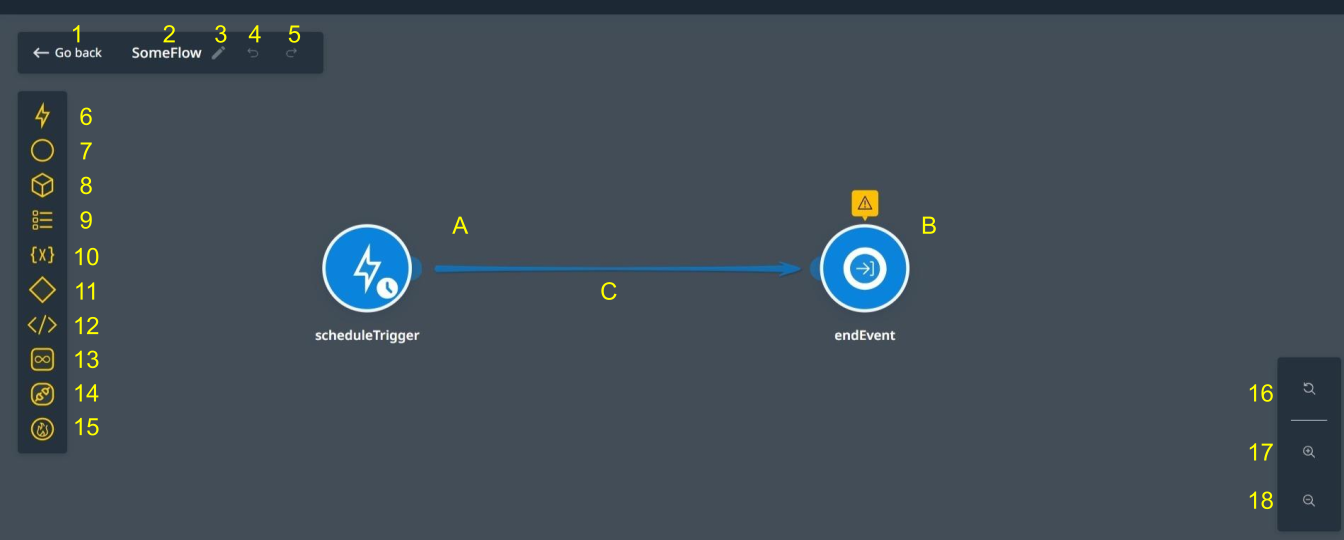
- Go Back: Quit editing
- Flow Name.
- Edit Flow Details: edit name, description, and package name. Please do not change the package name unless you understand its purpose and you adhere to Java package name rules.
- Undo: revert a diagram change.
- Redo: revert undo.
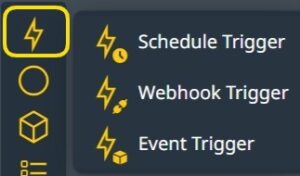
- Triggers: Select one of the following triggers:
- Schedule Trigger: triggers a flow at intervals or at a specific time of a selected day of the week.
- WebHook Trigger: triggers a flow from a custom exposed API endpoint.
- Event Trigger: triggers the flow from another flow. The other flow sends the event.
- Other triggers may appear when integrations are added to the app; see below.
- Events: These are activities to control the flow.
- Continue Event: In a loop, ignore the remaining activities and start a new iteration.
- Break Event: In a loop, leave the loop.
- End Event: quit the flow and pass the result to the caller.
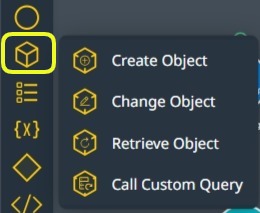
- Object Activities: These are activities dealing with Objects.
- Create: Creates a new instance of some type.
- Change: Change the properties of an existing object.
- Retrieve: Fetch one or more instances from the database.
- Call Custom Query: Fetch instances using an existing Custom Query.
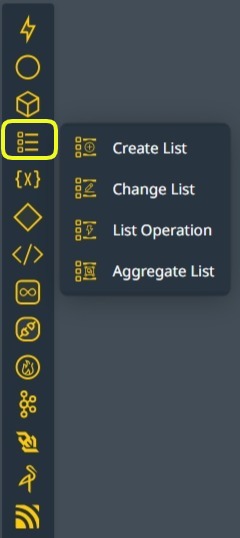
- List Operations:
- Create List: create a new list of homogenous types.
- Change List: Apply changes to a list.
- List operations: perform operations on a list, such as a find.
- Aggregate List: Aggregation Functions on a list.
- Variable Operations:
- Create a Variable: Create a variable for some object type.
- Change a Variable: Change a Variable value.
- Gateways: A gateway controls the processing flow.
- Condition gateway: testing a value and processing one of two possible branches.
- Enum Gateway: Select a different branch for each possible value for an enum variable (a finite list of possible values).
- Type Gateway: Select a different branch based on the type of an Object.
- Code: For the code-inclined, write any code using the built-in editor with Intellisense support. Coding is always optional and is available for people preferring it for some tasks.
- Define a method: define a Java method.
- Call a method. Such a method can be defined in the apps your app depends on or as a Java artifact referenced in Dependencies.
Code can be written using your preferred IDE, such as IntelliJ, and merged by WC for continuous development with Wizzdi Cloud and other external tools.
- Loops: Create loops. Loops can be nested to any level.
- Call External API: Access pre-defined and custom APIs in the App.
- Integrations: Use any of the current integrations added to the app.
- Kafka: A high-throughput, scalable streaming and messaging platform.
- MinIO: Distributed, high-performance object storage system.
- WebSocket: Protocol for full-duplex communication over TCP.
- MQTT: Lightweight, publish-subscribe network protocol for devices.
- Fit Flow. Move Activities into the visible area, and zoom as needed.
- Zoom In.
- Zoom Out.
Update:
As of October 2024, additional tools are available in the flow editor:

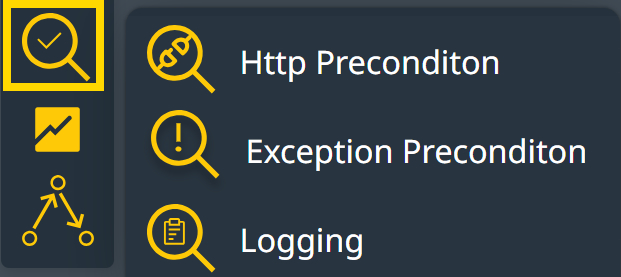
Provides tools for generating HTTP exceptions based on flow input data.
20 Micromeeter toolsProvide tools for Spring Micrometer support compatible with libraries like Prometheus and Grafana.
21 Flow CallingSupport the direct calling of a flow from another flow, properly passing parameters and receiving a response. This activity extends the call flow through events; however, the call flow by event cannot return a value.
Note: When an activity dialog is open on the screen, it can be moved by clicking and dragging on the empty space around the dialog.
The flow diagram in the image above appears as a default view upon creation. It includes two connected activity icons
A. Schedule Trigger: A flow starts with a trigger; the default trigger is a schedule trigger.
B. End Event: A flow must end with an End Event. This is where processing terminates, and a result is returned to the caller.
- Drag any icon on the diagram canvas to a new location.
- Click on any icon to edit it.
- Use the mouse wheel to zoom in or out of the diagram.
- Use the bottom right tools to fit to the screen, zoom in, and zoom out.
- Use the top left tools to edit the name and package name of the flow, undo, and redo.
- When dragging an icon from the left toolbar, position it on an existing line to insert it between two icons. Move the new icon over the line till the line is lit up, then release the icon.
When a Trigger icon is placed on a connection line, all icons to the left become disconnected and should be removed from the diagram.
Expressions #
Whenever a value must be set in a flow activity, trigger, or event, an expression editor can get it from a calculation, existing data, or a combination of both.
Depending on the complexity of the required value, these values can sometimes be set without accessing the expression editor.
In Wizzdi Cloud, the management of object fields—whether setting them for new objects, altering them in existing objects, or applying filters for retrieval—may be handled through an expression editor. This editor functions in a way that’s analogous to the formula features found in spreadsheet applications like Microsoft Excel and Google Sheets, where expressions are used to perform calculations or manipulate data.
The expression editor in Wizzdi Cloud utilizes the syntax of Spring SpEL (Spring Expression Language), a powerful expression language that supports querying and manipulating an object graph at runtime. Spring SpEL expressions can be used for a wide range of operations in Wizzdi Cloud, from setting default values for object fields to defining the logic for filtering data during retrieval.
When Wizzdi Cloud generates code, the expressions written in Spring SpEL are translated into standard Java code. This conversion process ensures that the high-level, user-friendly expressions are turned into executable code that can run within the Java environment.
The appendix provided in the Wizzdi Cloud documentation likely contains various examples of how Spring SpEL can be used within the platform. These examples serve as a practical guide for users to understand and craft their expressions for different purposes.
The SpEL editor in Wizzdi Cloud has features like Intellisense, an intelligent code completion tool. Intellisense assists users by suggesting functions, methods, and property names as they type, helping to prevent syntax errors and speeding up the expression writing process. This feature is particularly useful for those who may not be familiar with the full syntax and capabilities of Spring SpEL, as it can guide them through the process and improve their efficiency when working with data in Wizzdi Cloud.
See some samples
Note:
An alternate approach was introduced in many places where expressions can be used. This can be either an explicit value or a selection of an existing variable from the flow-defined variables. When the value required is an Object Type, setting its inner field values is possible without accessing the expression editor.
Flow Icons #
Triggers #
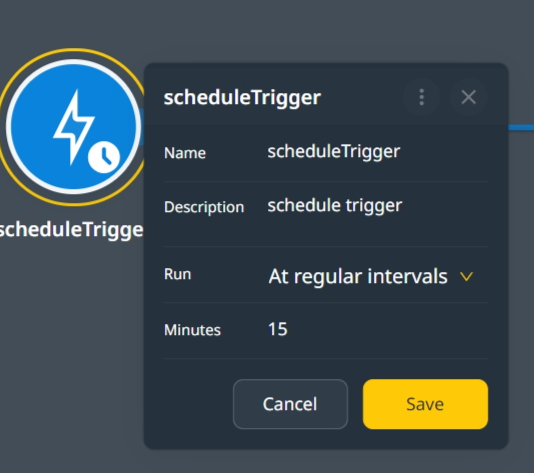
Schedule trigger #
Available fields:
Name: The trigger name must be a valid variable name, starting with a lowercase letter and containing no spaces.
Description: document this trigger.
Run: Select the scheduling type for the trigger at regular intervals or on days of the week.
Trigger at Intervals
This trigger can run in intervals, say, every 15 minutes.
Intervals are always in minutes.
Trigger at Intervals
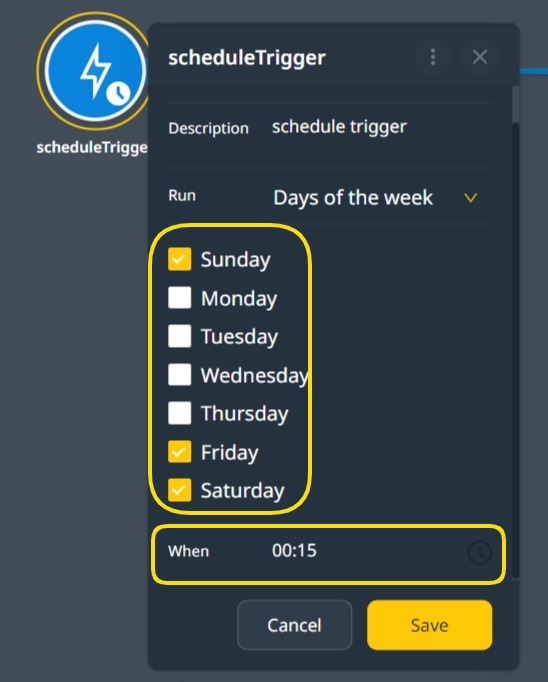
Trigger at a specific time of the day.
The ScheduleTrigger can be set to trigger at specific times and repeat daily at a particular time.
Select the days of the week using the ShceduleTrigger type.
Available Fields:
Weekdays: select the days of the week you want the trigger to fire.
When: select the time of the day you want the trigger to fire.
Proceed to select the time of the day.
Select the hour and minutes using 0-23 notation
Webhook Trigger #
A WebHook trigger is activated from an exposed REST endpoint.
Integrating a WebHook with a business service establishes a direct connection between a custom, exposed REST API endpoint and a Flow.
This flow is triggered when the custom endpoint receives a request. The endpoint can optionally pass a request body, headers, path parameters, and query parameters to the Flow.
The end event of the flow includes the response generated by the Flow. The response should match the response defined in the custom endpoint.
Creating a flow bound to a custom API.
This can be created from the API endpoint or the flow creation.
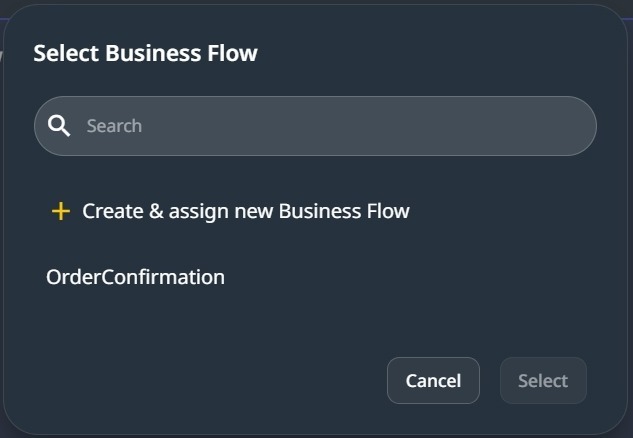
Create or select the flow from the API endpoint (recommended)
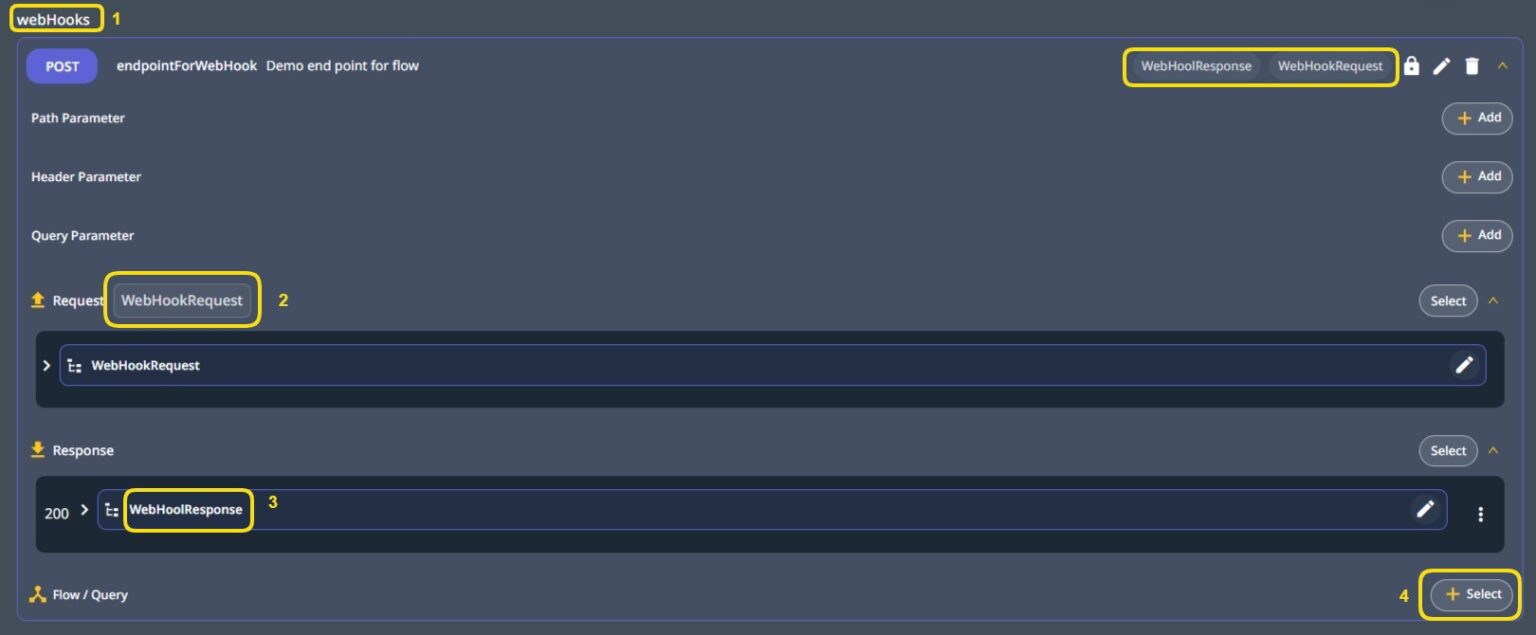
- Tags under which the custom endpoint appears in the exposed endpoints list.
- The Request object
- The Response object
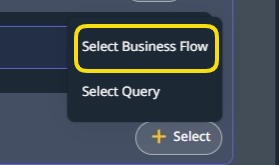
- Select a Query or a Flow. It can be an existing one or a new one.
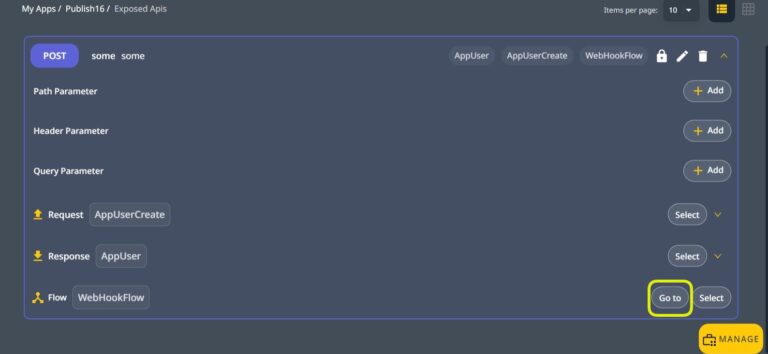
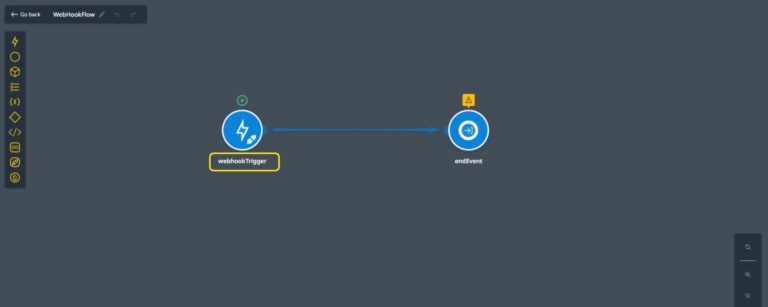
Go to the flow from the custom API endpoint.
The new flow has a Webhook trigger instead of the default schedule trigger.
A WebHook trigger triggers the new flow, the required variables for the request body (if it exists), and the parameters the endpoint passes are already defined based on the exposed API endpoint Request Object.
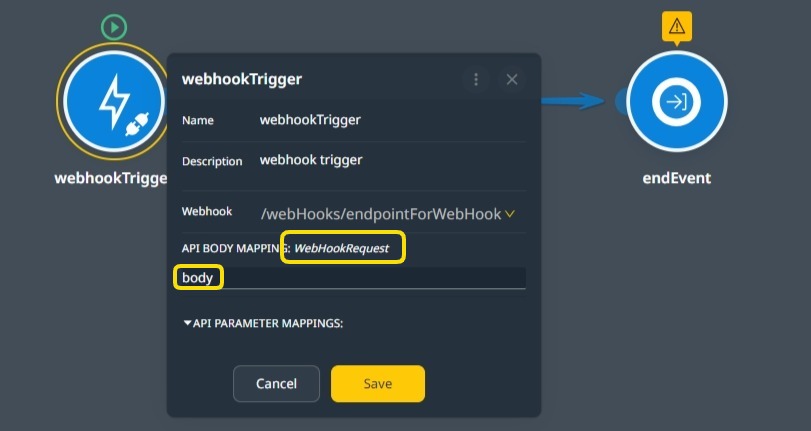
The new Flow has the correct Object type on the trigger as defined on the API endpoint. In the above picture, the variable name of the passed object is ‘body’. Other flow activities can use this variable.
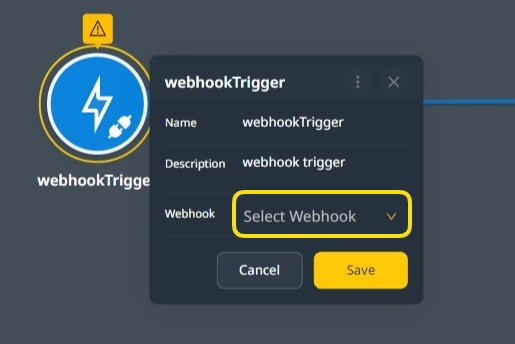
Create the Webhook on a new Flow.
Place a new WebHook trigger on a new flow connection line. The connection line connects the default trigger with the end event. Delete the existing trigger.
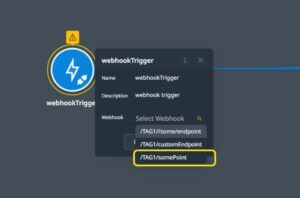
An API endpoint can trigger a single flow. If the selected endpoint is already connected to a different flow, a warning dialog is presented.
Note: To trigger multiple flows from a single endpoint, you can fire an event that multiple flows can handle from this single flow.
Once the webhook is saved, the required variables are auto-created based on the Endpoint definitions.
Webhook Trigger fields.
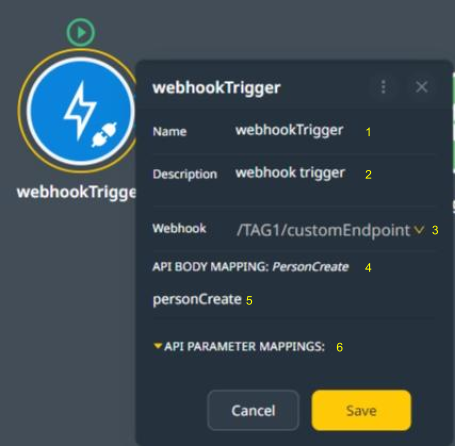
- The trigger name should be a valid Java field name.
- Description, use for documenting the activity.
- The path to the connected API endpoint (WebHook).
- The Object type passed to the flow.
- The object’s name passed: use this name when referring to the passed body and its fields.
- Mapping for endpoint parameters: Query, Path, and Headers if defined at the endpoint.
Event Trigger #
Wizzdi Cloud systems use an event trigger to start a flow when a particular event occurs. This event is represented by an event object, which can either be predefined by the system or defined by the user. Typically, events are triggered by actions like creating or updating an entity. Custom events can also be defined, where some conditions can be tested to check if the flow should be executed.
The same event can trigger multiple flows.
Flows can also be explicitly called from other flows; see below.
Create an Event Trigger
You can always drag an event trigger from the toolbar to the connection line and delete any existing trigger.
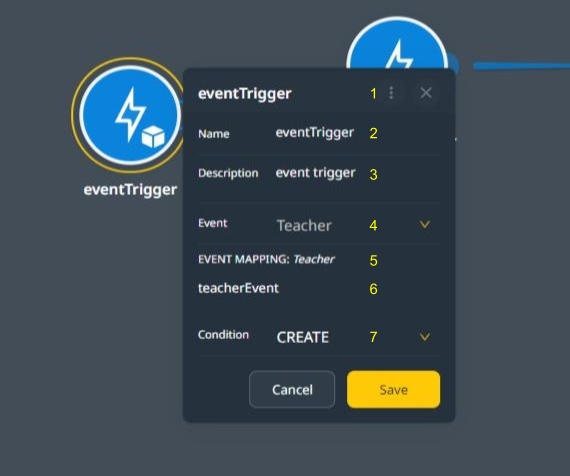
The event-trigger dialog.
Event trigger fields
- The type of the trigger.
- The name of the trigger
- The description for this trigger.
- The type of object firing this event. In our case, a Teacher object Type..
- The name of the Object Type.
- Specify the instance name of the object triggering the flow, which will be referred to in subsequent activities.
- Condition: It will only fire on the following conditions: Create, Update, or Custom.
- Create: This flow is triggered whenever an object of the specified type is created.
- Update: This flow is triggered whenever an object of the specified type is updated.
- Custom: This option allows you to use an expression to filter for a custom condition. When the condition is evaluated as true, the flow processing commences.
When events are fired?
Events are fired based on the runtime selected and some other conditions.
- If the fireEvent activity is used in one flow to activate another, the object type used in the fireEvent should match the one selected on the event trigger; the event trigger condition should be set to none or evaluated to true.
- The above works on both runtimes, Spring Boot and Flexicore Boot.
- Spring Boot:
- If the object type is an Entity, the flow will be activated when there is no condition.
- If there is a condition, it should be evaluated as ‘true ‘ in the custom condition.
- To use Create or Update conditions, the entity must have two fields defined as Creation Date and Update Date, respectively. See the field’s purpose when defining the domain model.
- Flexicore Boot, Flexicore
- If the Object type is an entity, the entity is sent to the triggered event.
- CREATE and UPDATE can be used as conditions; there is no need to set a creation date and update the date on entities in Flexicore derived from Basic. See elsewhere on this document on FlexiCore extensions over Spring Boot.
Sending a custom Object from one Flow to another flow.
- When an Event Trigger is defined, there is no option to define an object type. Only existing types can be selected.
- If you need to create a new object type, you must do so from consumed or exposed APIs.
- Once you create such an Object on a dummy endpoint, you may delete the endpoint; the definition remains available
. Note: The soon-to-be-released version of Wizzdi Cloud offers a new Object definition inside the flow.
Integrations Triggers #
When Integrations are added to an App, additional triggers may become available from the flow toolbar. For example, Kafka, Websocket, and MQTT integrations add triggers.
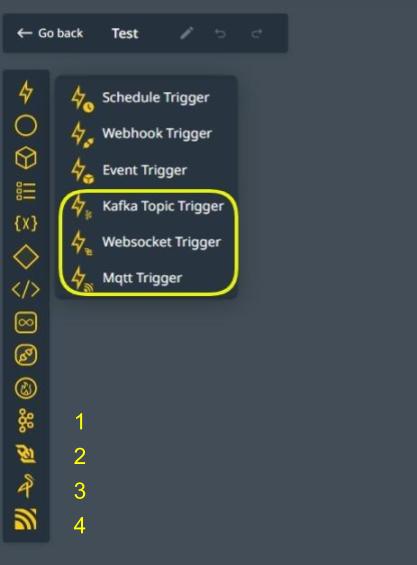
Triggers and Activities when integrations are added.
The idea is the same for Kafka, WebSocket, and Mqtt triggers: an instance of an object sent by the integration is passed to trigger the event.
Events #
Events
Events are used at the end of the flow (End Event) or inside loops (Break Event, Continue Event).
The Break Event and Continue Event are located under the Loop Icon.
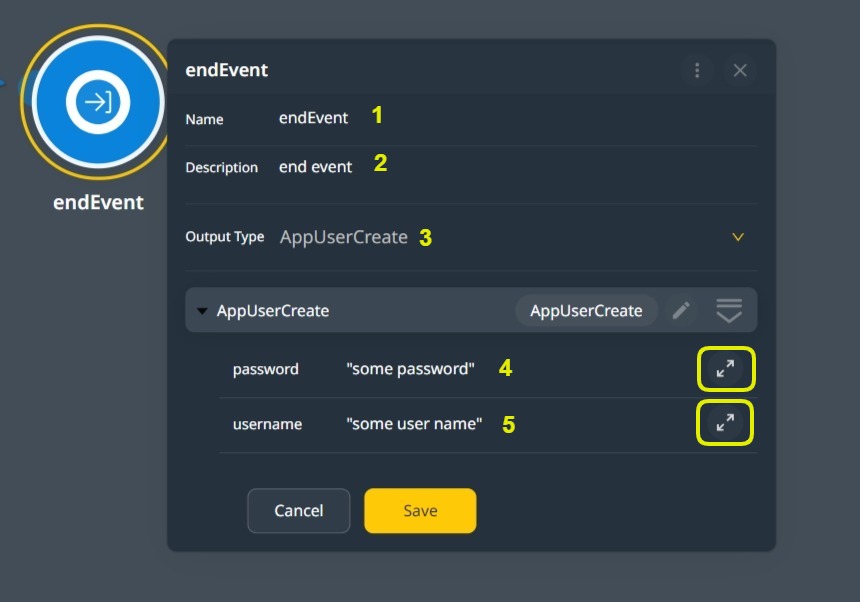
End Event #
A flow must end with at least one end event. The EndEvent defines a response value in a predefined Object type.
When a WebHook triggers the flow, the response type in the EndEvent must match the defined response for the associated endpoint.
When an event triggers the Flow, for instance, one fired by another flow, the response has no meaning. A common practice is to change the received object to contain the required data the publisher requires.
How to
Drag an event icon and place it on the flow; new flows include such activity already.
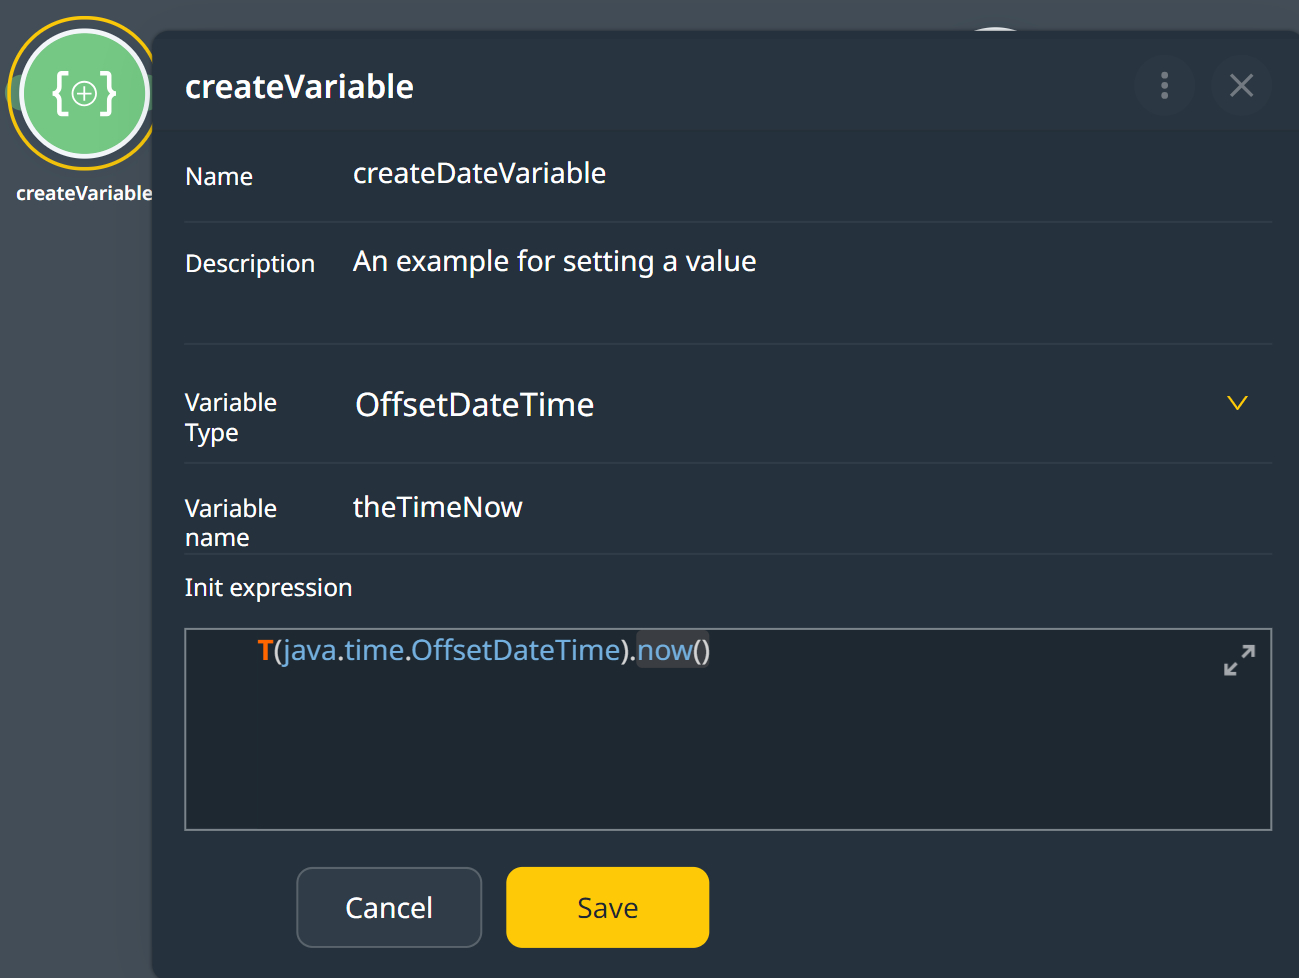
End Event – example returning Time and Date (with proper timezone)
Objects #
The Object Activities #
Think of an Object Type as a mold in a factory. This mold can be used to create multiple instances of the Object Type, similar to how a mold for a toy might be used to make many identical toys. However, each instance created from this mold can have different characteristics or attributes filled in. For example, if the mold is for making a toy car, each car can be painted differently, have other types of wheels, or feature various stickers. Each toy car is an instance of the mold, and while they all share the same basic structure, they can each have unique attributes. In the Wizzdi cloud, instances of Object Type are called Objects.
Each object in the workflow would have attributes and statuses that reflect its current position or role in the overall business flow. For instance, an object could represent a customer order that moves through various stages like order placement, fulfillment, shipment, and delivery. Different operations might be performed on the object instance at each step in the process, such as updating its status, modifying its details, or moving it to the next stage in the workflow.
Here’s how the functions in the interface relate to managing the lifecycle of an object within a business flow:
- Create Object: This initiates a new instance in the workflow. For example, it could be used to start a new customer order.
- Change Object: This function alters the details of an existing object as it progresses through the flow. For example, it might update the status of an order from “pending” to “fulfilled.”
- Retrieve Object: Looks up and retrieves object instances. This applies to entities only.
- Call Custom Query: Executes predefined queries tailored to the business’s needs, which may involve complex data retrieval across different stages of the business flow. For example, a custom query might gather all orders that are ready for shipment.
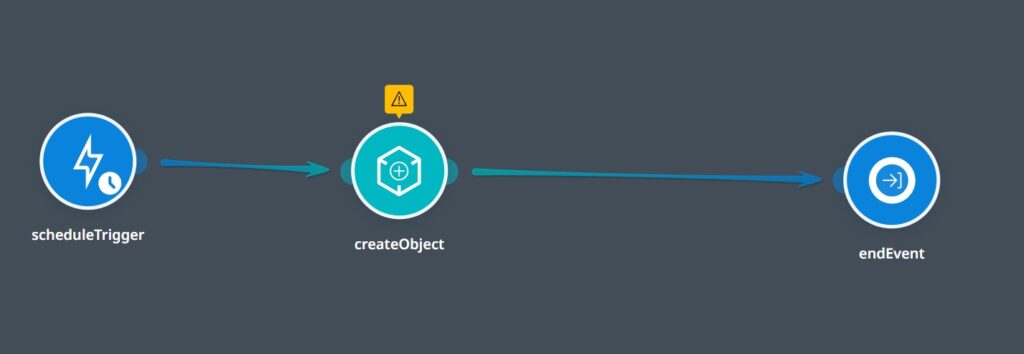
Create Object #
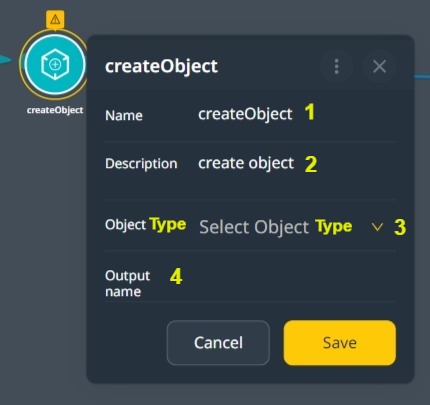
The dialog below shows the Create Object activity before any selection.
#
- Activity Name: Every activity within the flow is assigned a name. This name is used to identify the activity and typically reflects the action or step in the business process it represents. For example, an activity might be named “invoiceGeneration” or “qualityCheck.” Note that names have built-in restrictions, such as no spaces.
- Activity Description: Each activity has a description along with its name. This description offers additional details about the activity’s purpose or action and is displayed as a tooltip when a user hovers over it within the flow. This feature aids users in understanding the function of each step without cluttering the visual representation of the flow. Furthermore, there is functionality to embed these descriptions as comments in the source code generated by the Wizzdi Cloud, enhancing code readability and maintenance.
- Object Type: This refers to the type of object that the activity creates or manipulates. The object type must be pre-defined within the App and is part of the digital representation of the business process. For example, the object in a sales process flow could be “CustomerOrder” or “PaymentReceipt.” For Entities, there is an option to create a new Entity from the Create Object activity.
- Output Name: once an object is created or modified by an activity, it must have an output name, which serves as a handle or reference to that particular instance for the duration of the flow. This allows the object to be identified and accessed by subsequent activities within the flow. For example, if an object named “orderDetails” is created, it can be referenced by that name in downstream activities such as ChangeObject, etc.
Once the Object Type is selected, the user can fill in its fields.
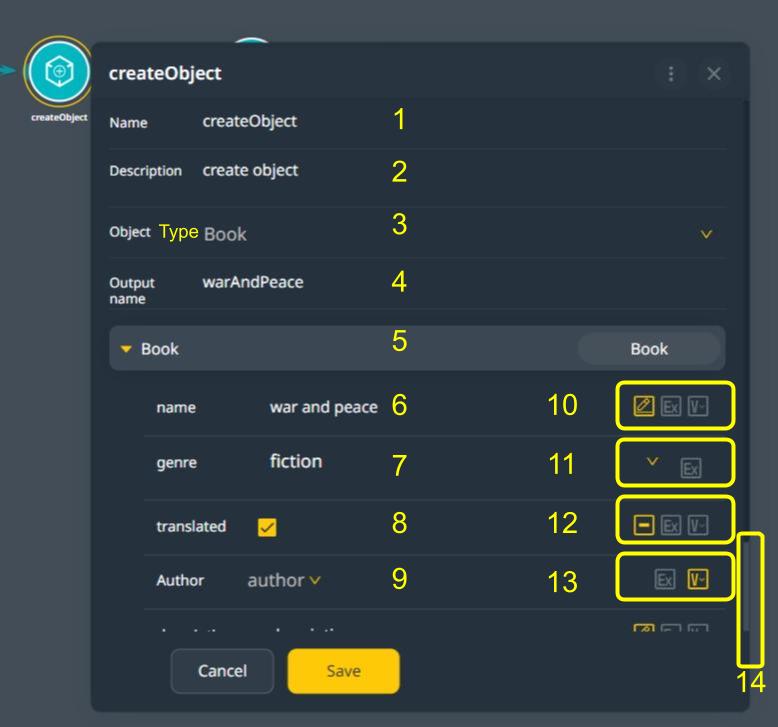
Note: The selected object type is a Book, as shown in the screenshot above. Although it was arbitrarily chosen, it helps to understand how field types affect the user interface.
Field Editors #
Based on your needs, each field can be filled using one of three tools, encircled under 10 above:
- Pencil: This is the default tool for simple types and allows for the literary setting of a field’s value based on its type. For example, a boolean field editor is a checkbox, and a list of fixed values (ENUM) is a drop-down.
- Expression Editor (Ex): The Expression Editor can be used when you need a more complex value, such as the current value from an iterating list. Familiarity with SpEL syntax, at least the basics, is required.
- Variable Picker(V): When the required value fits any defined variables in the flow upstream activities.
Note: The expression editor can define a field value with any combination of literals, functions, and variables.
Legend:
- Activity Name – must conform to Java field naming.
- Activity Description
- Object Type—The selected Object Type can be any app or system-defined Object Type. Once selected, the user interface reflects its fields. We have selected a Book entity; this is arbitrary and has no special significance.
- Output Name – the variable name to which this object is assigned can be referenced in the flow downstream activities.
- The Object Type Header – a title for the fields below. This bottom part is collapsible.
- Name —In our example, the book’s name field is displayed as a text field because it is a String type.
- Genre- In our example, the book’s genre field appears as a dropdown field because it is an Enum type.
- Translated – In our example, the translated field of the book is shown as a checkbox field since it is a boolean type.
- Author – The default dropdown editor displays available Author type variables defined upstream because the field type is an Object Type.
- Available tools for a text field.
- Available tools for an enum field.
- Available tools for a boolean field.
- Available tools for an Object field.
- Scroll to expose more fields of the selected Object Type (3).
Change Object #
Once objects are instantiated in upstream activities (designed to be executed before the current activity), the Change object Activity can change them.
Drop the Change Object activity on an execution line or an empty diagram area and open it.
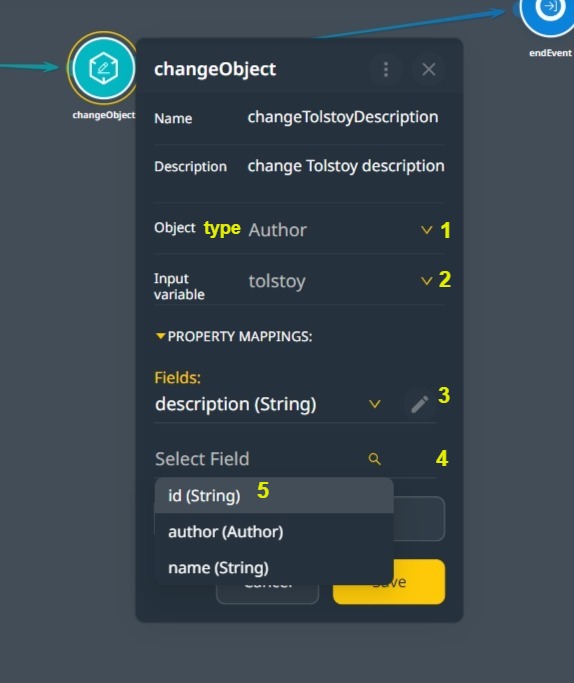
- The Object Type of the changed Object.
- The Object is to be changed. If the Object Type is selected, the list of Objects is filtered by that Type. If the Object Type isn’t selected, selecting an Object sets the Object Type.
- Edit a field. See (4) below. Object fields should be selected first. Click on the icon to edit the field.
- Select a field to be changed.
- When selecting a field, the list now includes unselected ones.
Retrieve Object(s) #
This activity pertains to obtaining data from a database, an everyday necessity in software systems, especially when dealing with data-driven responses or processes.
- Use in Custom APIs: When the App exposes custom API endpoints for use by other systems or user interface clients, it often needs to retrieve specific entities from its database to compile the data necessary for the API’s response. For example, if the API is designed to provide customer details, the activity would fetch customer entities containing information like names, addresses, and transaction histories.
- Batch Processing: There are situations where a set of entities needs to be processed as a group. This could involve batch updating records, performing calculations, or generating reports. For instance, a financial system may fetch all transactions for the end-of-day processing to calculate interest or fees.
- Integration with External APIs: Entities from the local database often must be sent to external APIs. This is common in integrations where two different systems communicate with each other, such as sending order details from an e-commerce system to a shipping provider’s API to arrange delivery.
If the requirement for retrieving entities is straightforward, such as fetching a list of all products in a catalog, the resulting list will contain entities of a single type, all sharing the same structure or schema. In this case, the Retrieve Object is a good fit for the job.
However, there are instances when the needed information is not contained within a single entity type. In such cases, the “Call Custom Query” activity (below) can fetch data from multiple entities that may be combined. Custom Queries are potent tools that specify complex data retrieval operations, such as joining data from various entity types. Custom Queries enable you to define a custom structure for the output list, including fields from multiple related entities. For example, you might need a list that combines customer information with their respective order histories and payment statuses. Custom Queries would allow you to define and retrieve a complex list tailored to your requirements.
Drop a Retrieve Object activity on an execution line or a diagram space.
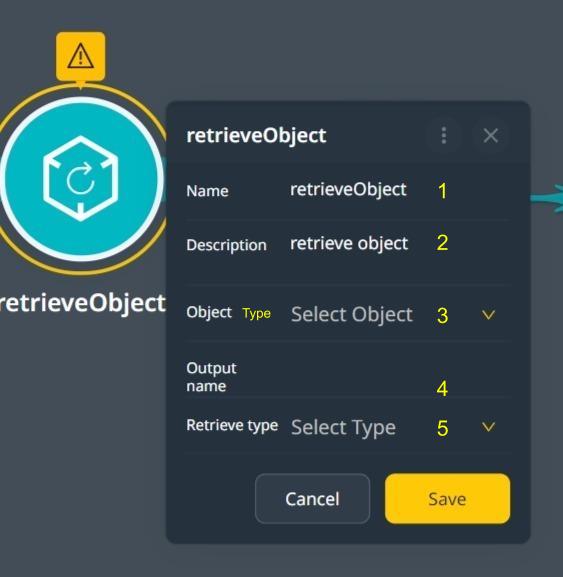
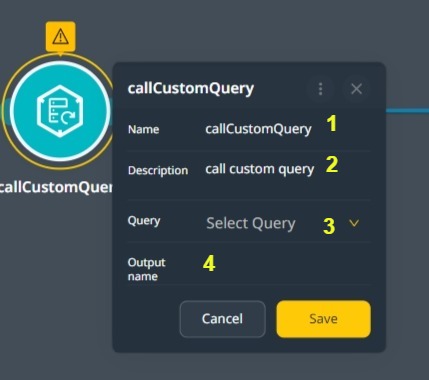
- The Activity name.
- The Activity Description.
- Object Type Selection.
- Output Name selection: This variable name will be used for the result of the Retrieve Object activity. Depending on the Retrieve Type, it will be either the selected Object Type or a List of the selected Object Type.
- Select the Retrieve Type. It has the following options: all, first, or any.
- ALL: The returned object type is a filtered list of the selected object type, such as a list of authors. The list is always returned, but it may be empty.
- First, Any: the returned type is the Object Type selected, such as a teacher. This instance may be valid or null.
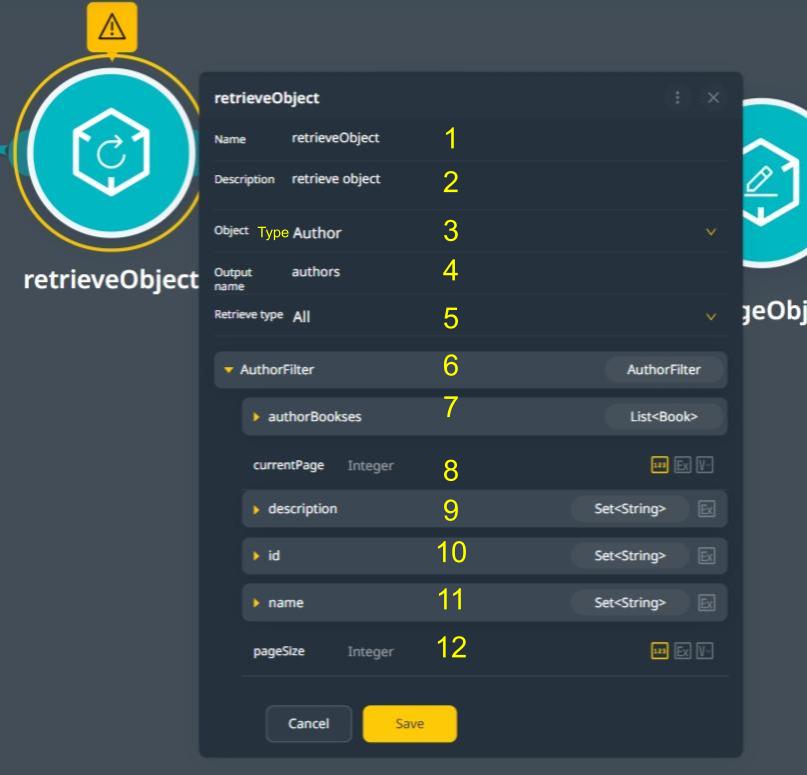
- The Activity name.
- The Activity Description.
- The selected object type in the above screenshot is Author.
- The selected output name in the above screenshot is ‘authors.’ The type of this output name will be a List as the Retrieve Type in (5) is All. The selection
- Retrieve type is All.
- A title for the filter: in the screenshot above, the filter is unpopulated.
7-12 These are unpopulated filter fields.
The retrieve object activity offers the same field editors for setting filter fields as the create object activity.
Adding Filters #
Retrieving entities from a database typically requires careful consideration to avoid performance issues. Fetching all entities of a particular type at once is generally inefficient and can lead to resource strain. Filtering mechanisms are employed to mitigate this.
Filtering allows for narrowing down the dataset to only those entities necessary for a particular operation or requirement. It can be based on specific criteria, such as a date range, a status, or any other relevant attribute of the entities.
Paging is a common filtering technique for managing data retrieval. It divides the results into “pages” of a specified size. This means that a subset of records is fetched instead of retrieving the entire dataset in one go. The size of each “page” or batch can be configured based on the application’s performance considerations and data processing needs.
As mentioned, Wizzdi Cloud provides built-in filtering capabilities that can be applied to any entity. These built-in filters are predefined and can be easily applied to retrieval.
For more complex filtering needs that cannot be satisfied by the built-in options, the Custom Query Request Object is utilized, and the required activity is Call Custom Query. This object provides flexible, user-defined filtering criteria, including multiple fields from the entity, complex conditional logic, and the ability to join data across different entity types.
When processing all entities of a certain type is necessary, the paging mechanism loops through the entities in manageable batches. This approach allows the system to process large datasets without overwhelming the memory or processing power by only handling a small subset of records at any given time.
In practice, the user specifies the desired filters once the object type is selected for retrieval.
Selecting from available built-in filters.
Adding Filters Details #
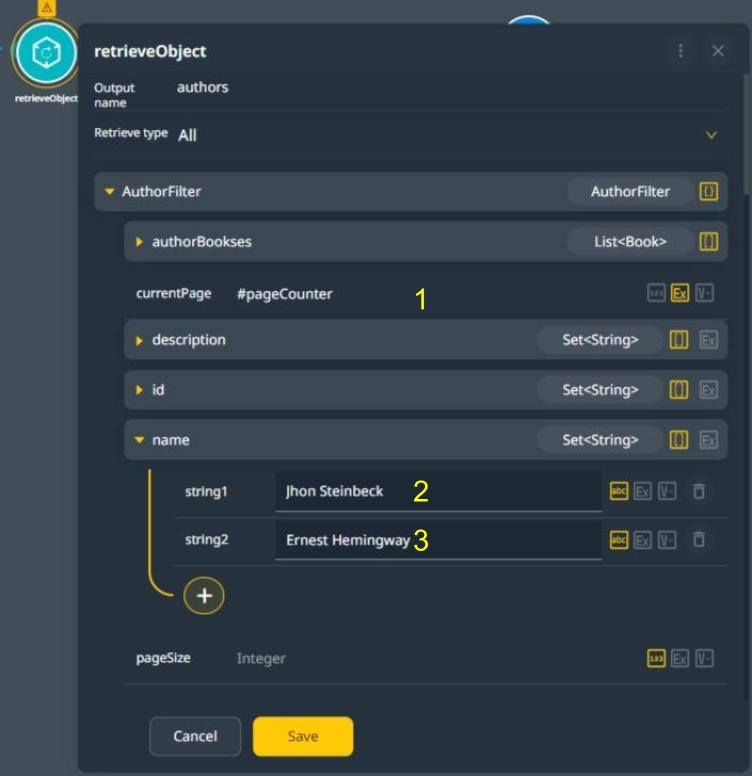
Select the pageSize filtering field and click the pencil icon to set the value.
The expression editor opens, and we set the page size to ten records constant.
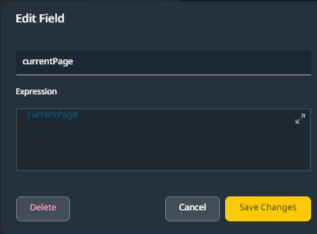
Current page setting from a variable.
A variable was created for the current page value (see variables below), and the expression references this variable. The image was taken while typing the word “current.“ The expression editor’s IntelliSense feature suggests the existing variable with its Object Type.
Call Custom Query #
Suppose the requirement for retrieving entities is straightforward, such as fetching a list of all products in a catalog. In that case, the resulting list will contain entities of a single type, all sharing the same structure or schema. In this case, the Retrieve Object is a good fit for the job.
However, there are occasions when the needed information is not contained within a single entity type, or filtering must be finer than what the built-in one provides. In such cases, the “Call Custom Query” activity (below) can fetch data from multiple entities that must be combined. A Custom Query is a powerful tool specifying complex data retrieval operations, such as joining data from various entities. Custom Queries enable you to define a custom structure for the output list, including fields from multiple related entities. For example, you might need a list that combines customer information with their respective order histories and payment statuses. Custom Queries would allow you to define and retrieve a complex list tailored to your requirements.
Once the Custom Query is set from the available custom queries, its request object is presented to be set with data from available object instances in the flow. See Figure 31.
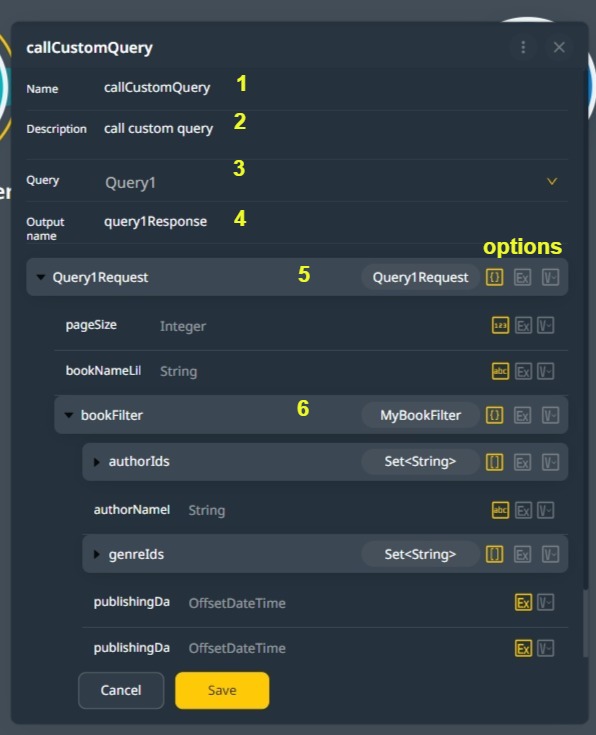
The custom query request defines the object type fields; see the screenshot below [Figure 32] for the matching definition in the Custom Query editor.
Set the Activity name in [1] and the activity description in [figure 32-2]. The query is set in [figure 31-3], and the response object variable name is set in [figure 31-4]. The response object type is defined in the Query and will be stored at run-time in the variable defined in [figure 31-4].
In the example dialog[figure 32] above, the request Object Type consists of several basic type fields, such as String, integer, OffsetDatetime, and a nested Object Type, The MyBookFilter object type. The call custom query dialog [F31] includes these fields for setting their values.
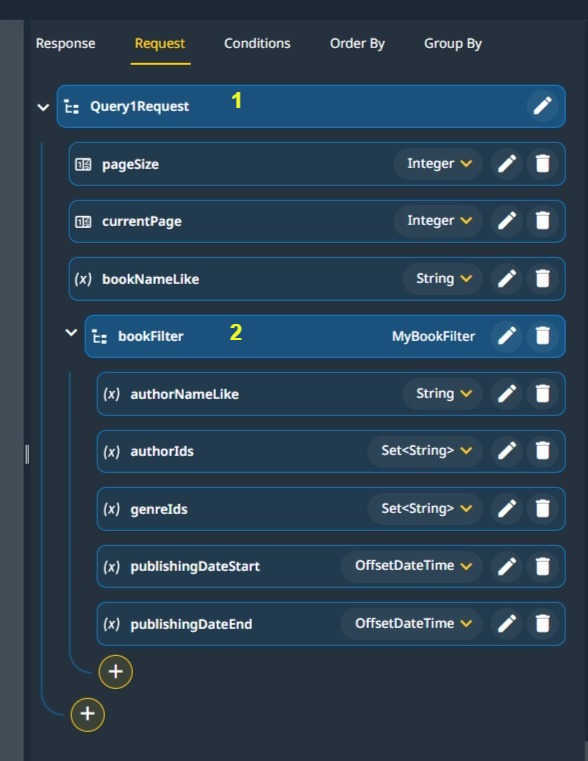
Note: The Call Custom Query activity may truncate long field names like publishingDateStart; put the pointer over the field name to see its full name.
When setting the values in the custom query request object, the following options are available:
- Setting the value for the field explicitly.
- Setting the value from a variable defined upstream in the flow, such as a currentPage variable, iterates pages in a loop.
- Setting the value from a SpEL expression is the most flexible option, but it requires at least basic knowledge of SpEL.
Note: The above options for setting a field’s value at runtime are not intrinsic to the Call Custom Query activity but are used in most of the available flow activities.
Lists #
Create A List #
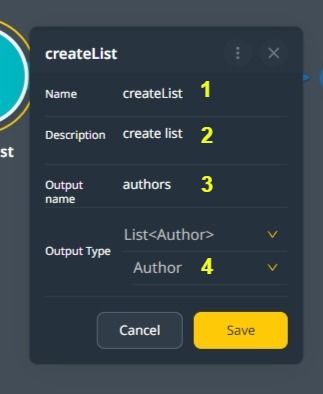
Drag a Create List Activity on an execution line to connect to activities on both sides.
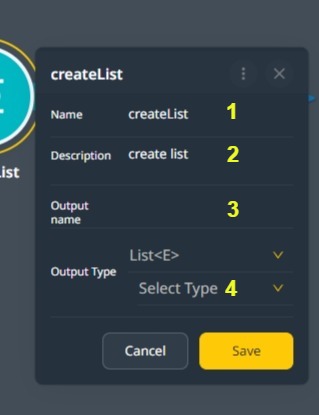
In Figure F34, the list element type has not yet been selected.
Select the activity name in F34-1 and its description in F34-2. The Create List Activity creates an empty list object and assigns it a name specified in F34-3. The output name is used to access the flow downstream activities.
The output name should never be confused with the activity name. The activity name and description help identify the activity while editing the flow. At run time, it has no significance. What matters is the output name that acts as a handle to the list and the element Object Type used. This handle is also called a variable.
Change a List #
Drop the change list activity on an execution line and let it connect to the activities on both sides.
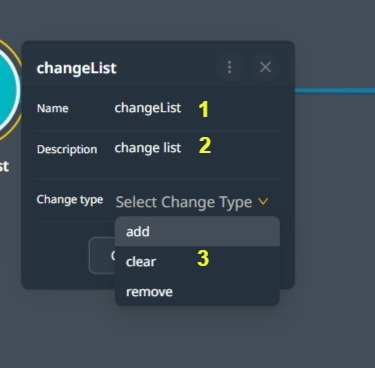
It can be ‘add’, ‘clear’ , or ‘remove’.
The change list activity has three options for the change: add, clear, remove
The Add and Remove command requires two parameters: the instance to add or remove and the list. The Clear change type requires only one.
List Operations #
List Operations are available from the list icon.
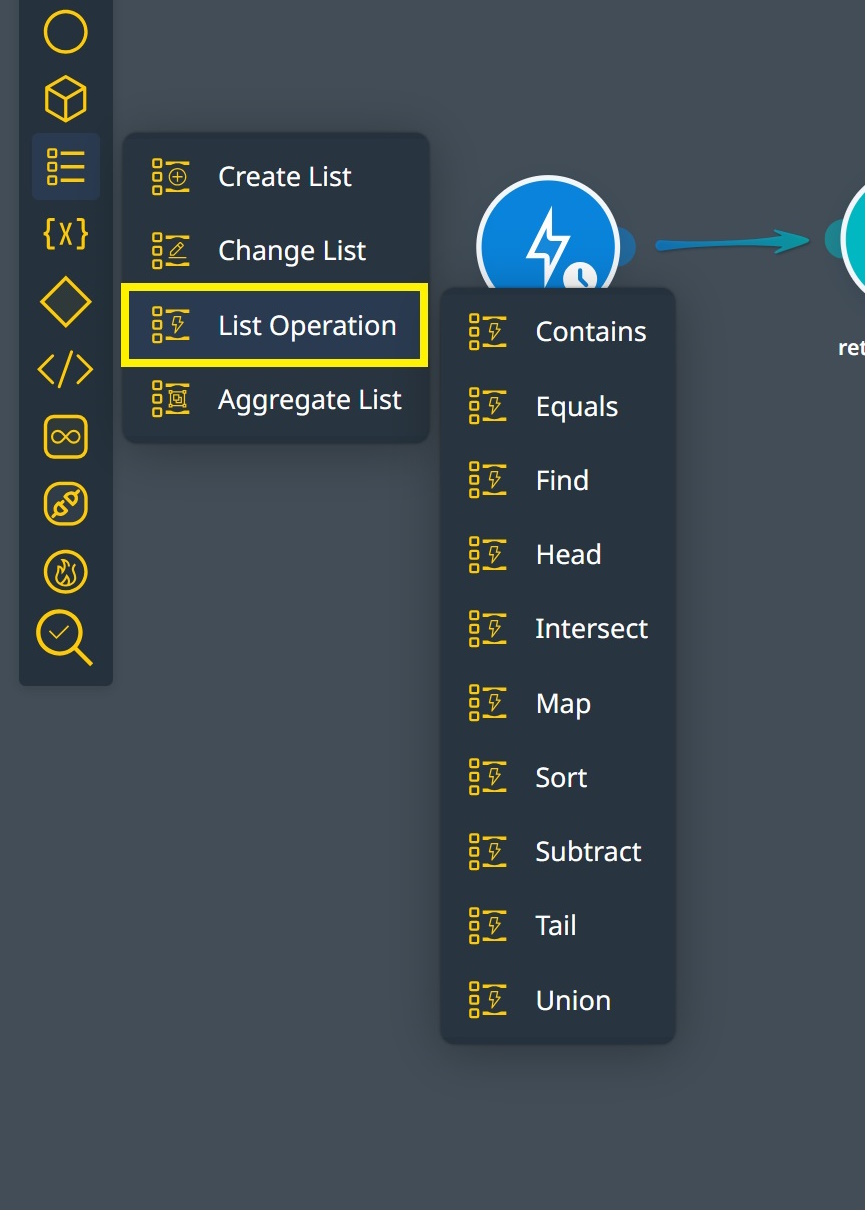
- Contains: This function checks if the first list contains all elements of the second list and returns a boolean value (true or false).
- Equals: Compares two lists to determine if they are the same in content and order of elements, returning a boolean value.
- Find/Filter: This function searches for elements in a list that match a specified condition and returns a new list with the matching elements. It can also return a single element if the ‘findFirst’ operation is used.
- Intersect: Creates a new list containing only the elements that are present in both of the original lists.
- Head: Retrieves the first element of a list if it exists.
- Map: This function transforms each element in a list based on a provided function or expression and can extract specific attributes from a list of objects, thus creating a new list.
- Sort: This function sorts the elements of a list according to the specified criteria, which can be in ascending or descending order based on one or more attributes.
- Subtract: This function removes all elements in the second list from the first list. The resulting list contains only those elements in the first list but not in the second.
- Tail: Retrieves the last element of a list if it exists.
- Union: Combines two lists into one, including all elements from both, even if duplicates exist.
To use these operations in Wizzdi Cloud, you would typically select the operation type from a dropdown menu, specify the input list(s), and, if necessary, provide additional expressions to dictate how the list should be manipulated. You would use the output name to reference the resulting list in subsequent activities within your workflow.
List Operations in detail #
This section demonstrates the creation of two lists of a single Object Type used in the remainder of the list operations documentation.
Contains List Operation. #
This operation checks whether one list can be found inside another list. The list being searched for is a sublist of the target list.
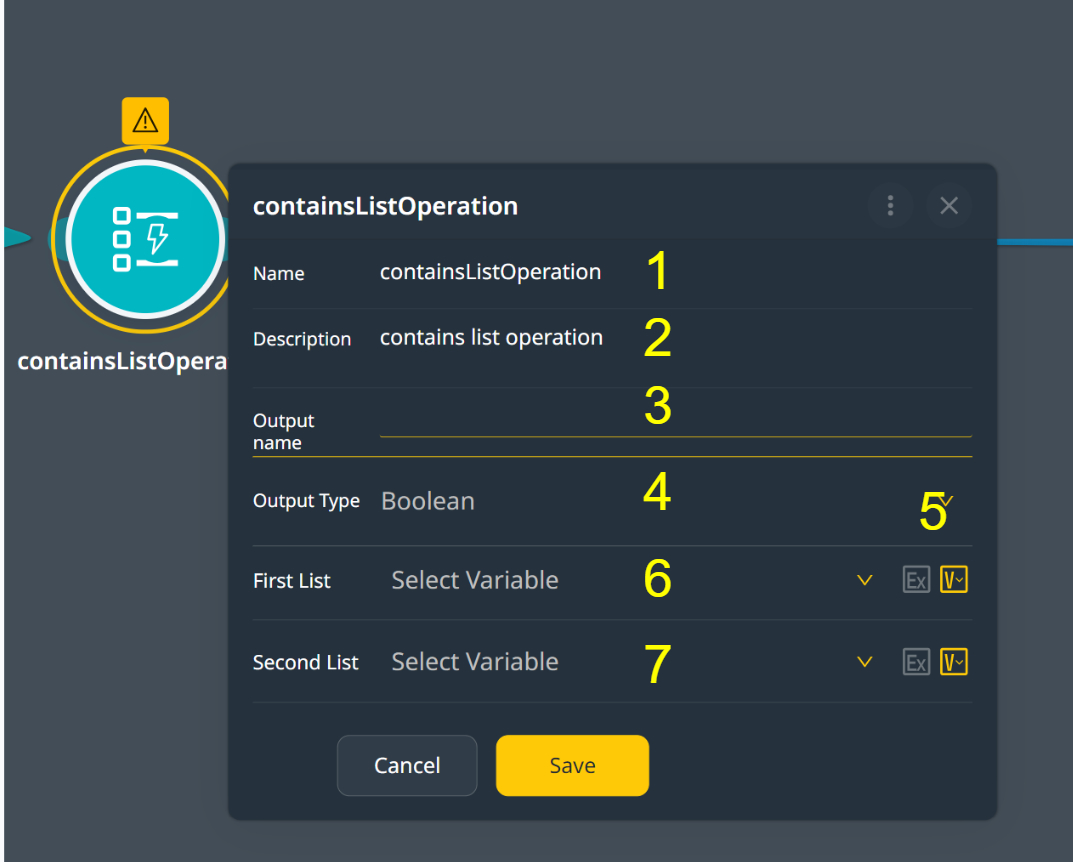
Legend
- The activity name.
- The activity description.
- The output name of the “contains-list” operation. This value is ‘true’ if the second list (the searched-for list) can be found in the containing list.
- The output name (variable) Object Type. For the Contains operation, this is always a Boolean.
- A selector for each list’s definition method. This can be either ‘V’ for ‘variable,’ where an explicit variable name is selected from the drop-down widget, or a Spel expression, providing more flexibility in determining the list.
- The containing list.
- The contained (search for) list.
Equals list operation #

Legend
- The activity name.
- The activity description.
- The output name of the “equals” operation. This value is ‘true’ if the second list equals the second one. For two lists to be considered equal, they must be of the same type and size, and each element in one list should match the corresponding component in the other list.
- The output name (variable) Object Type. For the equals operation, this is always a Boolean.
- A selector for the first list’s definition method. This can be either ‘V’ for ‘variable,’ where an explicit variable name is selected from the drop-down widget, or a Spel expression, providing more flexibility in determining the list.
- The first list.
- A selector for the second list’s definition method. This can be either ‘V’ for ‘variable,’ where an explicit variable name is selected from the drop-down widget, or a Spel expression, providing more flexibility in determining the list.
- The second list.
The Find in a list operation. #
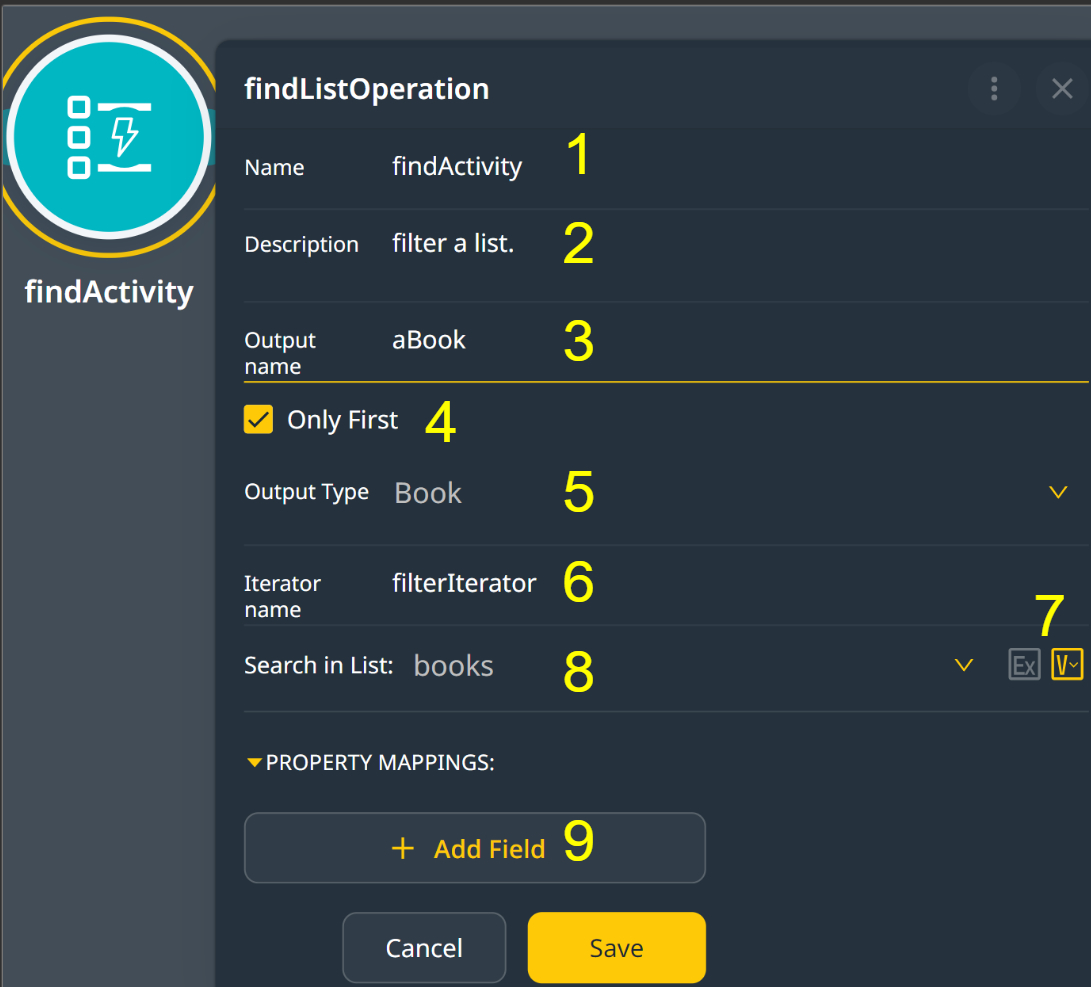
Legend
- The activity name.
- The activity description.
- The output variable is the name of the “find” operation.
- If checked, the find operation returns the first element in the list. If no matches are found, it returns null (empty). When this checkbox is unchecked, the find operation returns a list with all matching elements. The list may be empty, but it is never null.
- If the checkbox in #4 is unchecked, the result object type is the same as the list object type selected in #8. If #4 is checked, the result object type is the same as the object type of an element of the list selected in #8.
- The variable name of the list-iterator. A list iterator is a variable that refers to the current list element when the search takes place. This variable name may be used in any field expressions in this activity.
- A List selector method: if ‘v’ is selected, the list is selected from an existing variable; if ‘ex’ is selected, the list is defined using a Spel expression.
- The name of the list to find elements or an expression defining it.
- The ‘Add field’ button defines the conditions for searching the list specified in #8. Multiple conditions can be specified, and all must be ‘true’ for a list element to be included in the result.
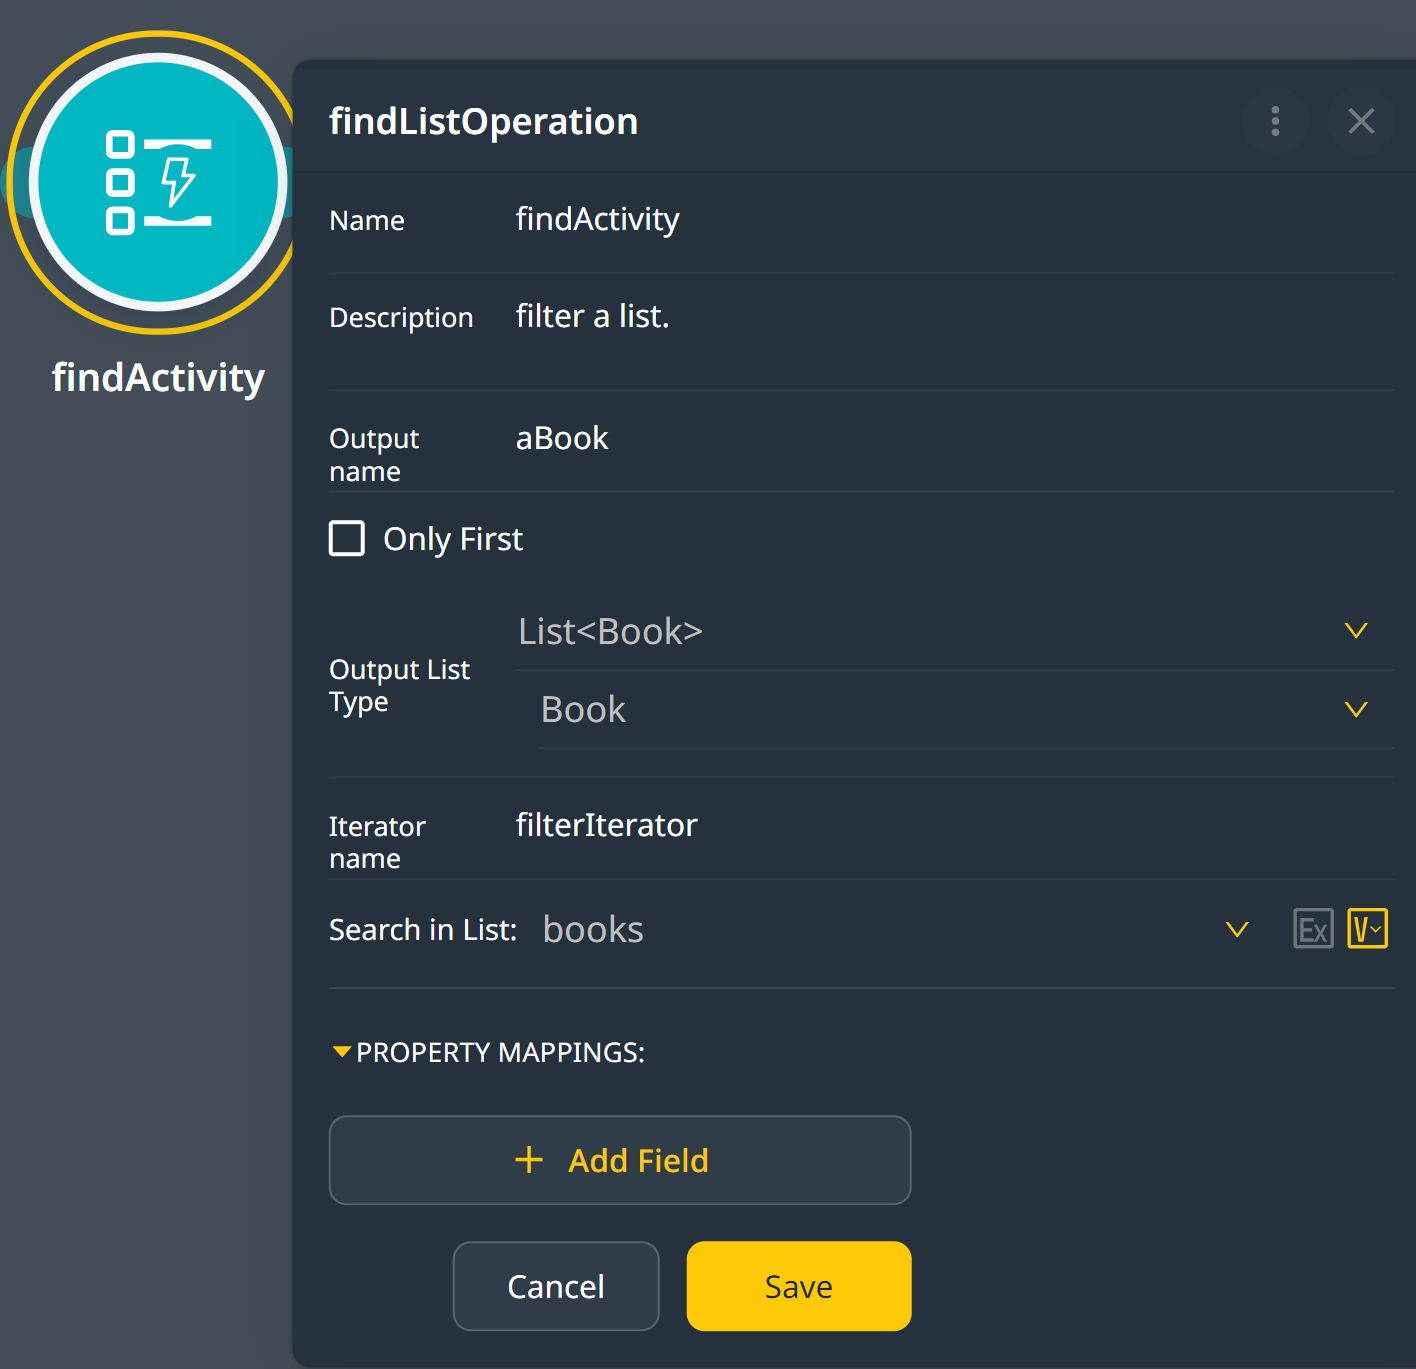
The ‘Add Field’ button
The find activity requires at least one condition to work. A SpEL expression always defines the condition.
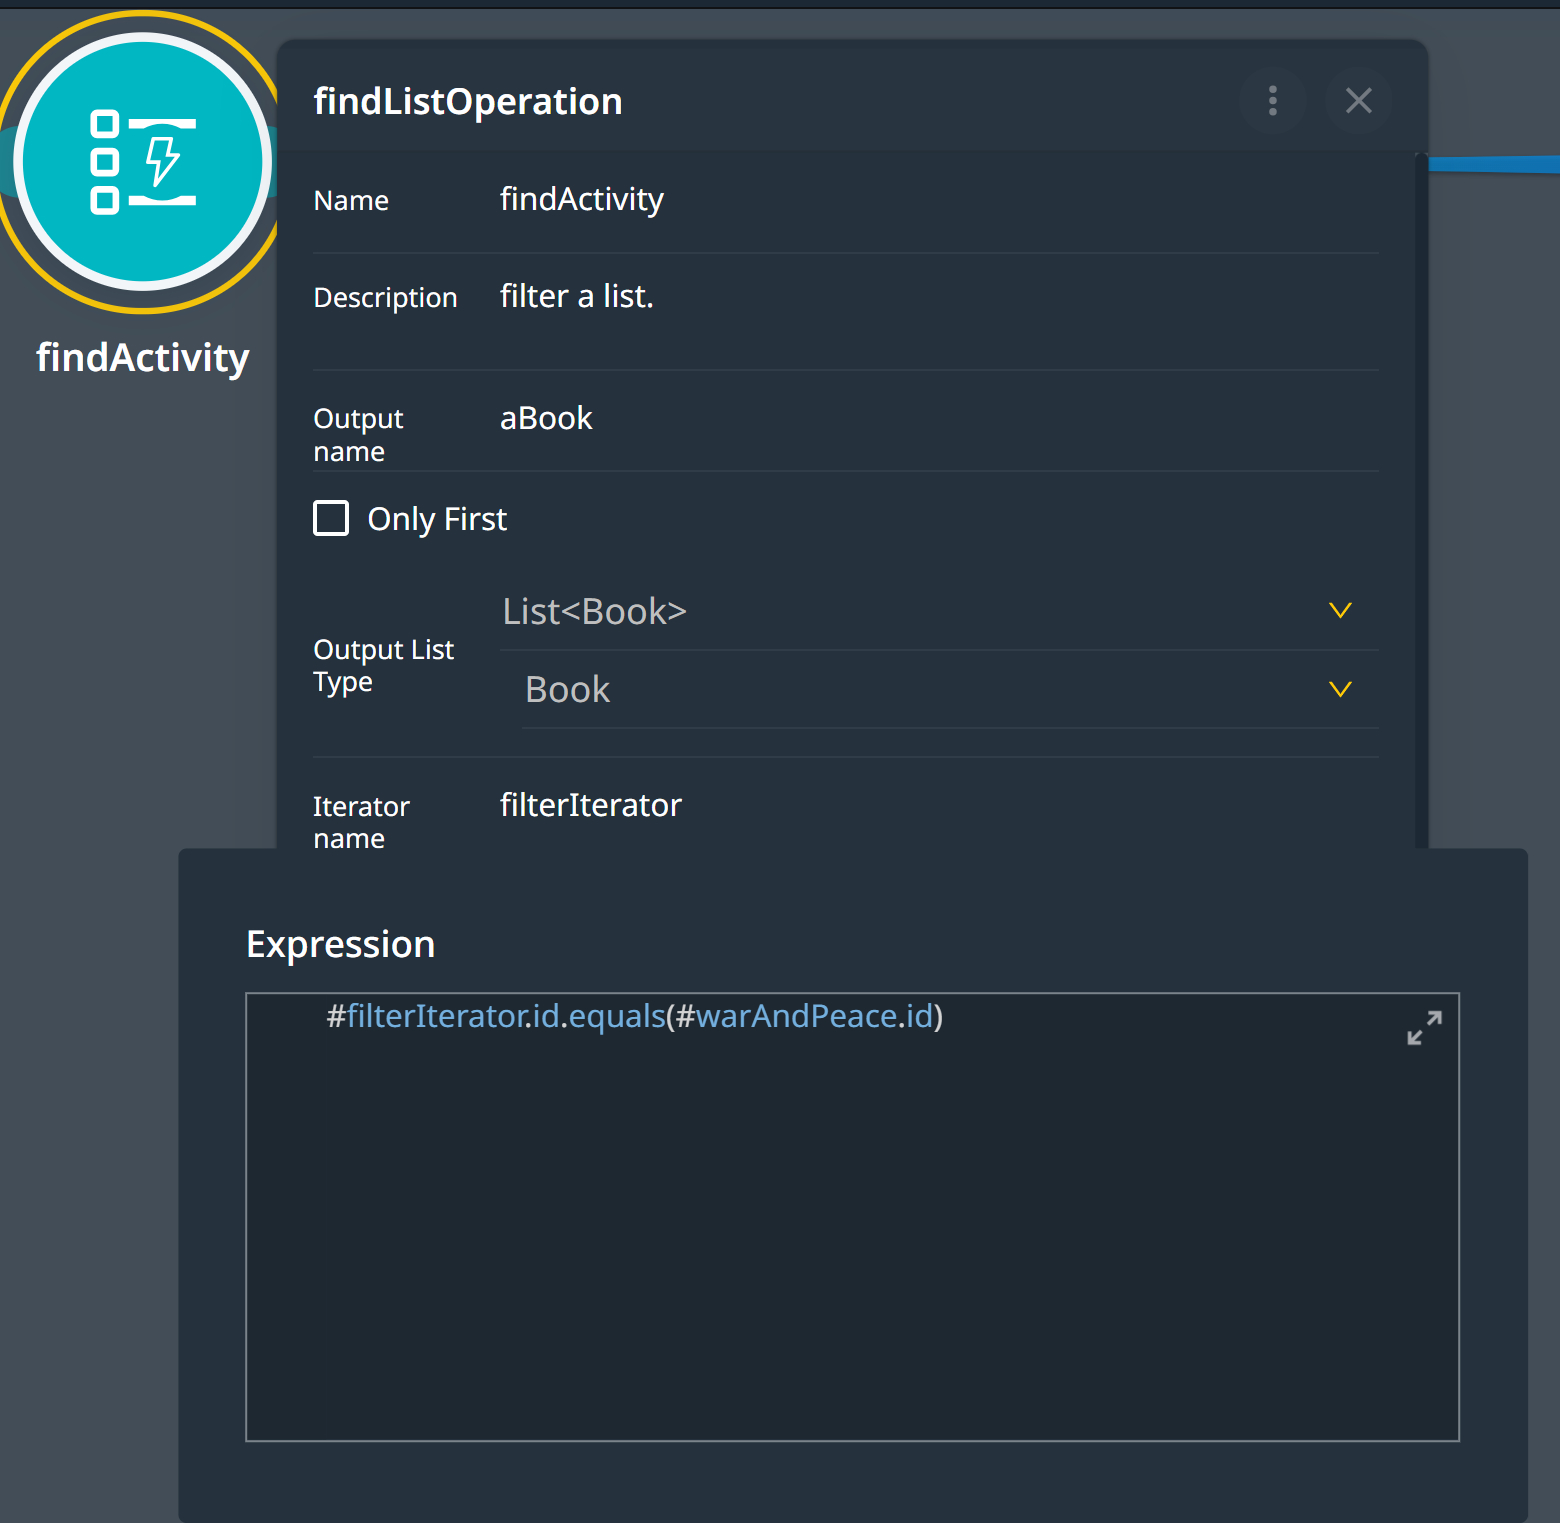
In the above example, we search the warAndPeace book in the list. The condition matches the id of the current element of the list with the id of warAndPiece book we have created upstream in the flow.
In Spel, the ‘#’ sign precedes a variable name to access it.
Head List Operation #
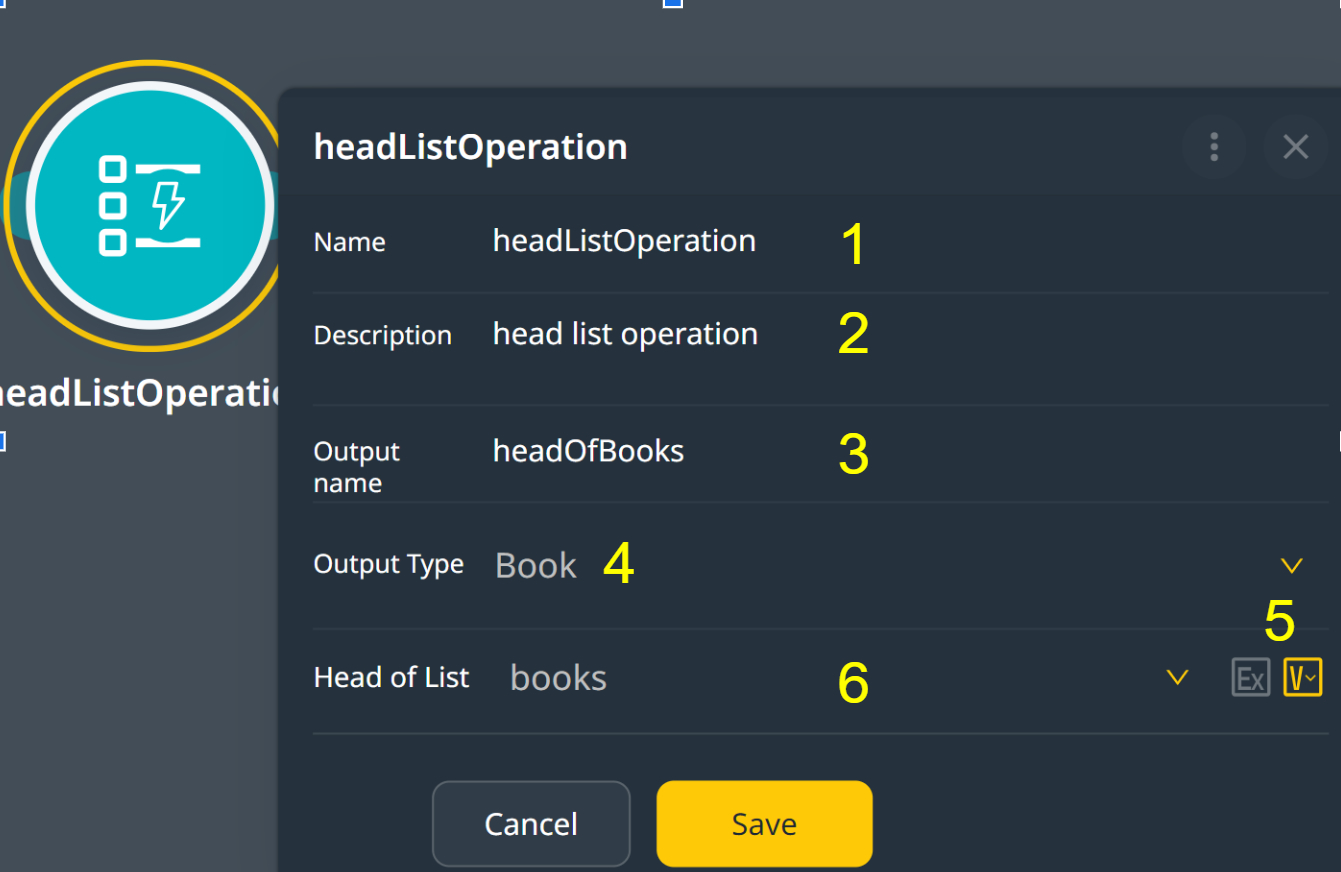
Legend
- The activity name.
- The activity description.
- The output variable name of the “head” operation.
- The output type of the result. This is the same type of element in the list.
- A List selector method: if ‘v’ is selected, the list is selected from an existing variable; if ‘ex’ is selected, the list is defined using a Spel expression.
- The name of the list to return the head of.
The Intersect list operation #
The intersect list operation creates a list from two input lists. The result list contains all identical elements in both lists. If an element appears more than once in one or both lists, the result list will contain the fewest occurrences found in any of the input lists.
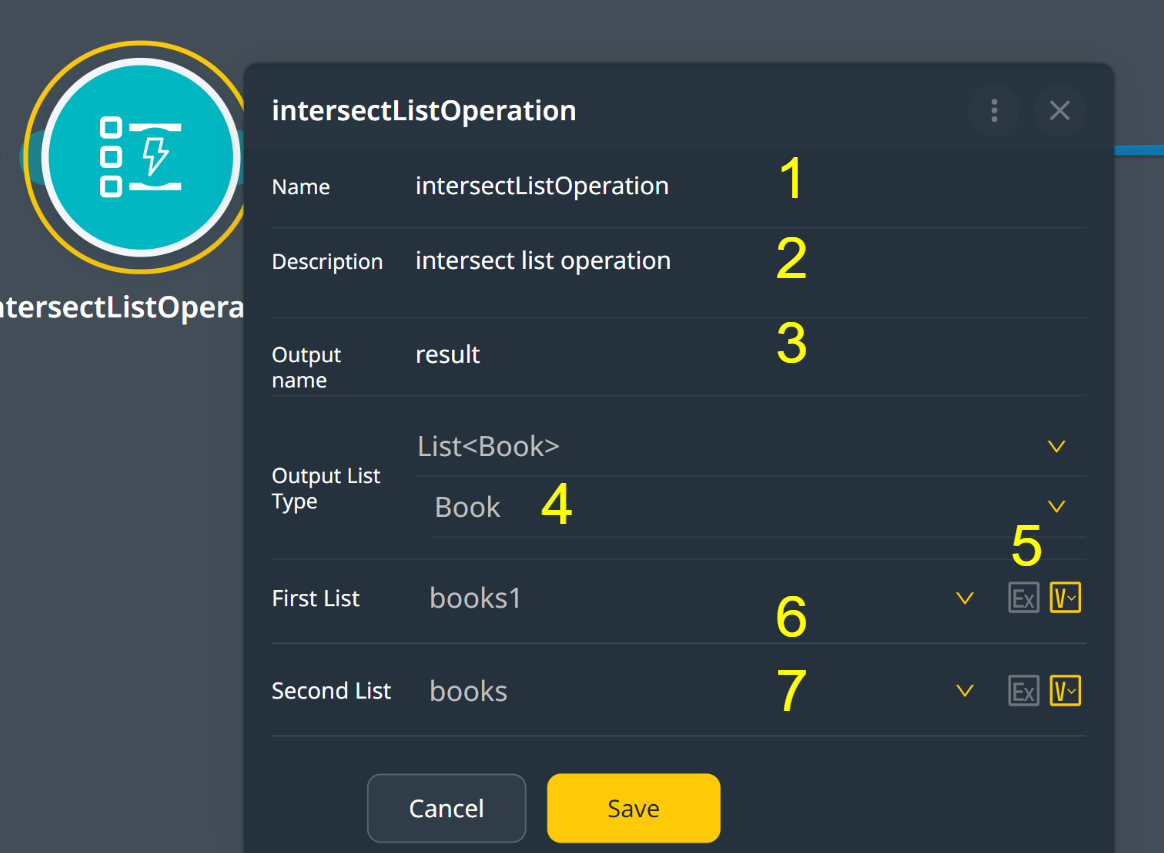
Legend
- The activity name.
- The activity description.
- The output variable name of the “intersect” operation.
- The output type of the result. The type is identical to the two input lists Object Type.After selecting a input list, the value in position #4 will be automatically set.
- A List selector method: if ‘v’ is selected, the list is selected from an existing variable; if ‘ex’ is selected, the list is defined using a Spel expression. The same method selector is available for the second list.
- The name or expression of the first list.
- the name or ‘expression’ of the second list.
The map list operation. #
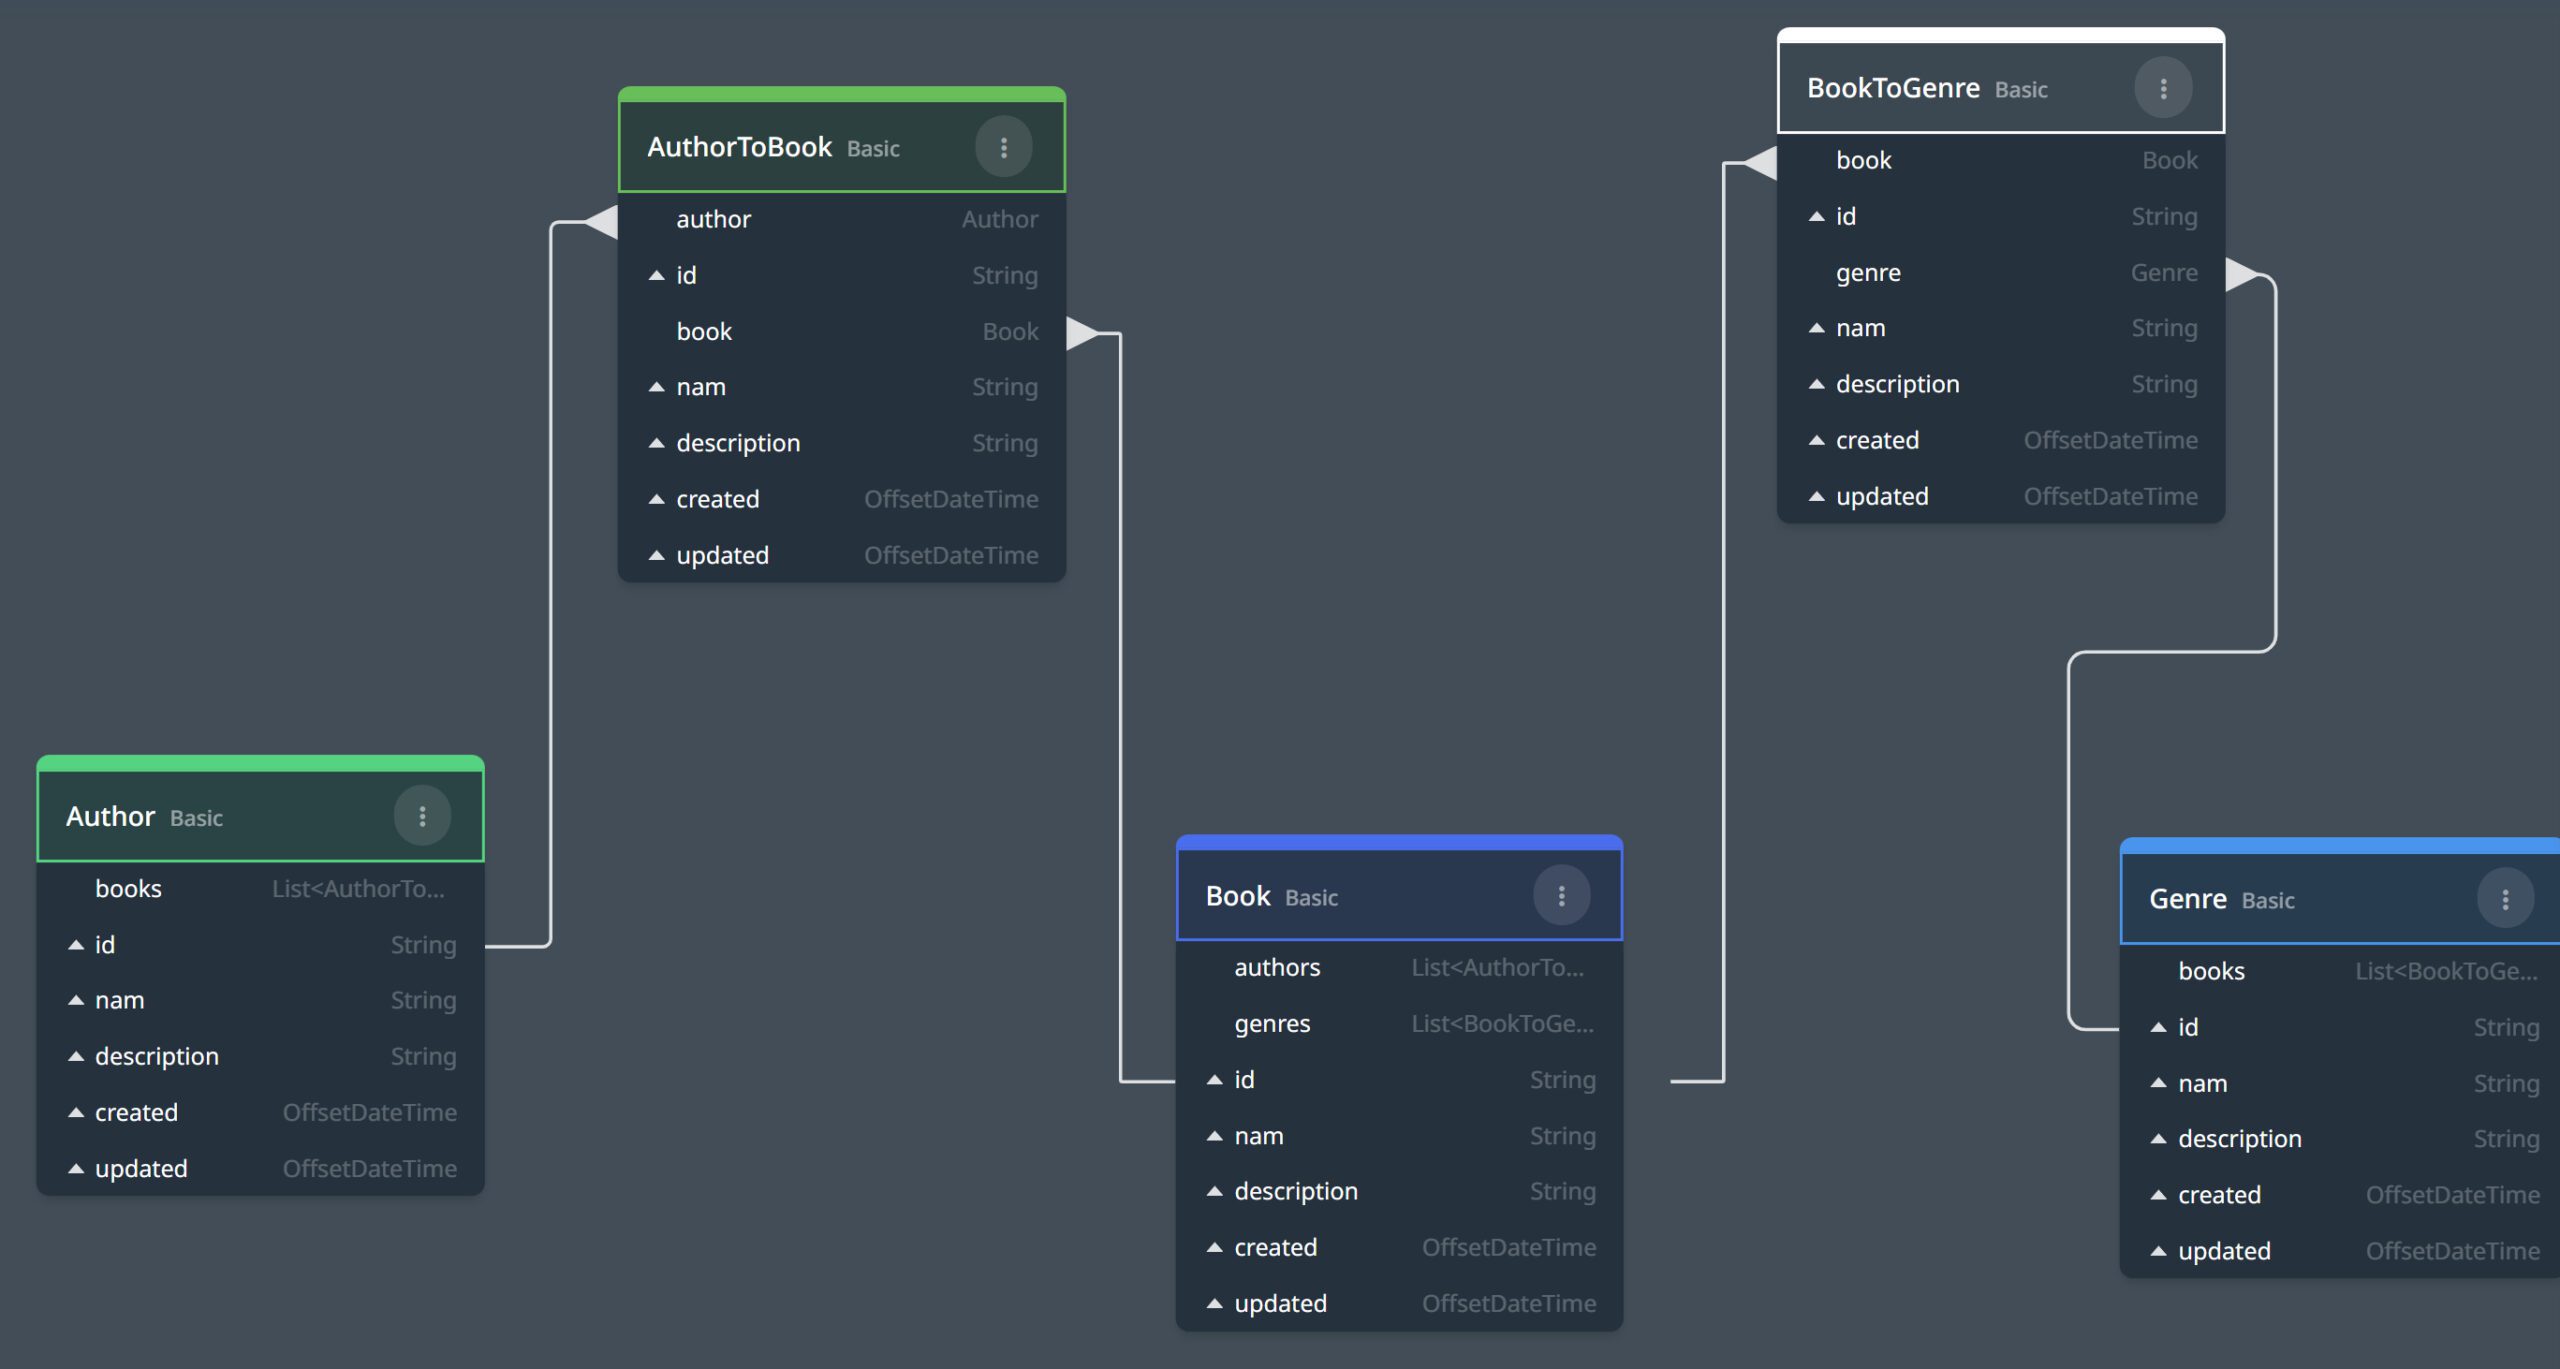
The map operation transforms a list to another list by accessing a specific field of any of its elements. Accessing a field can go to any depth in the object tree. For example, in the image below, a list of books is transformed to a list of the first author of each book. Be noted that each book may have more than one author as defined in the domain model above.
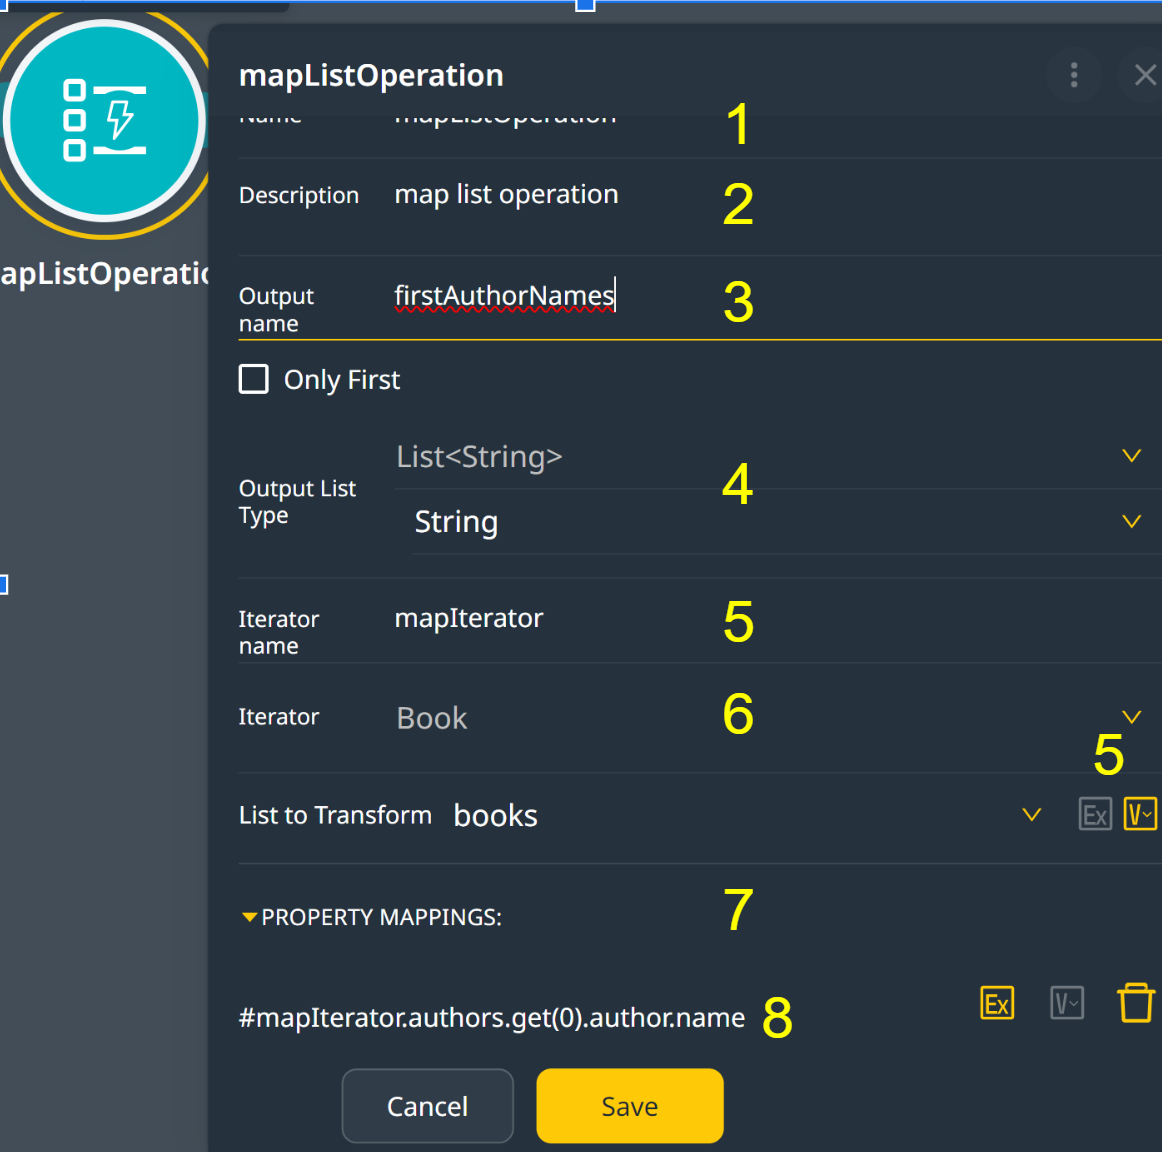
Legend
- The activity name.
- The activity description.
- The output variable is the name of the “map” operation.
- The output type of the result. If ‘only first’ is unchecked, the type is identical to the list Object Type. If ‘only first’ is checked, the output object type will be the Object Type of a list element, in the image above, a Book.
- The iterator name, like in find, is an internal variable used to traverse the list and transform each element. It is better to set the iterator name only after the list is selected
- The iterator Object Type.
- The name or expression of the first list.
- The name or ‘expression’ of the second list.
#
Variables #
Variables are used throughout the lifetime of a flow to store intermediate data, control loops, and more.
A variable is always a particular object type. It can be a simple type like String or Integer or a more complex Object type like Book.

Create a Variable #
Drop the created variable activity on an execution line; the empty activity should look like this.
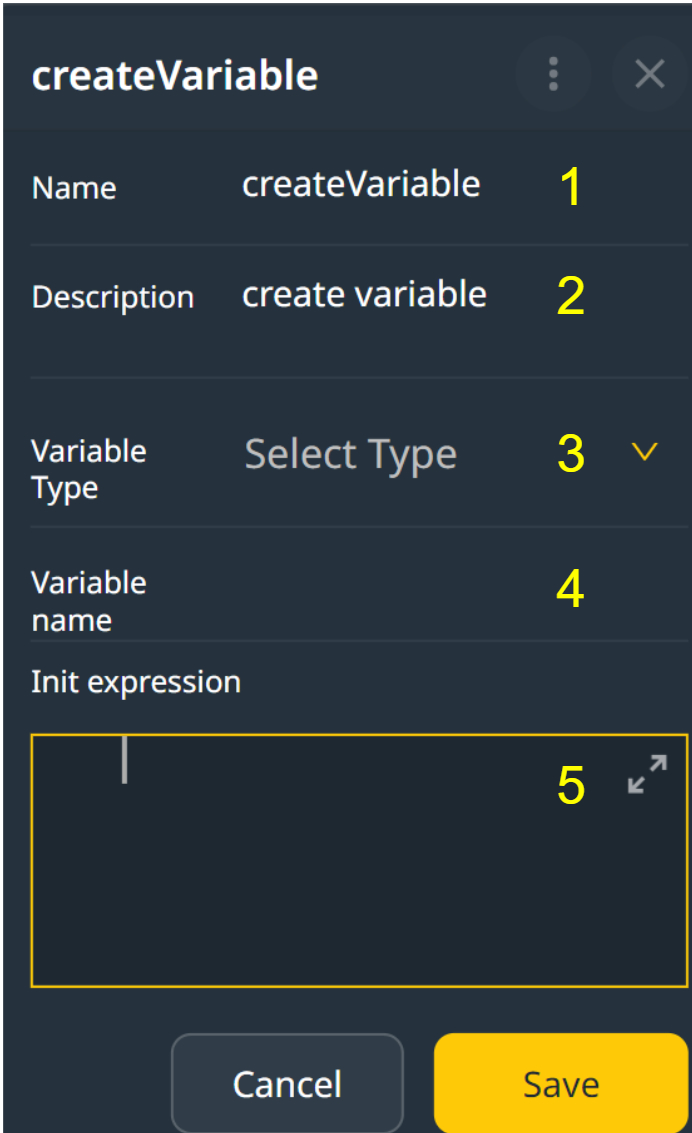
Apart from the standard name (1) and description (2), this activity requires you to fill in the following fields:
Variable type (3): Search for the required variable type. It can be any type, including entities and other objects.
Variable name (4): The name of the created variable; this is how it will be identified by activities downstream of the flow.
Init expression(5): The value given to this variable once it is created. This can be any Spel expression.

Gateways. #

Gateways are used to change the processing path in a flow based on the data being evaluated. Here are the different types of gateways:
- Condition Gateway: This gateway directs the flow along true or false paths based on specified conditions.
- Enum Gateway: This gateway allows for multiple possible values, each corresponding to a different processing path.
- Merge Gateway: This gateway merges multiple processing paths back into a single path, allowing the flow to continue.
- Type Gateway: This gateway enables processing to follow different paths based on the descendant type of a parent type.
Each gateway plays a crucial role in managing the flow of processes effectively.
Condition Gateway #
The Condition Gateway evaluates an expression and changes the execution path according to the result.
Eventually, all execution paths must merge before the flow endEvent is reached.
Consider the following flow:
The condition in this flow check is that two variables are equal, and based on the result, they take a different execution path.
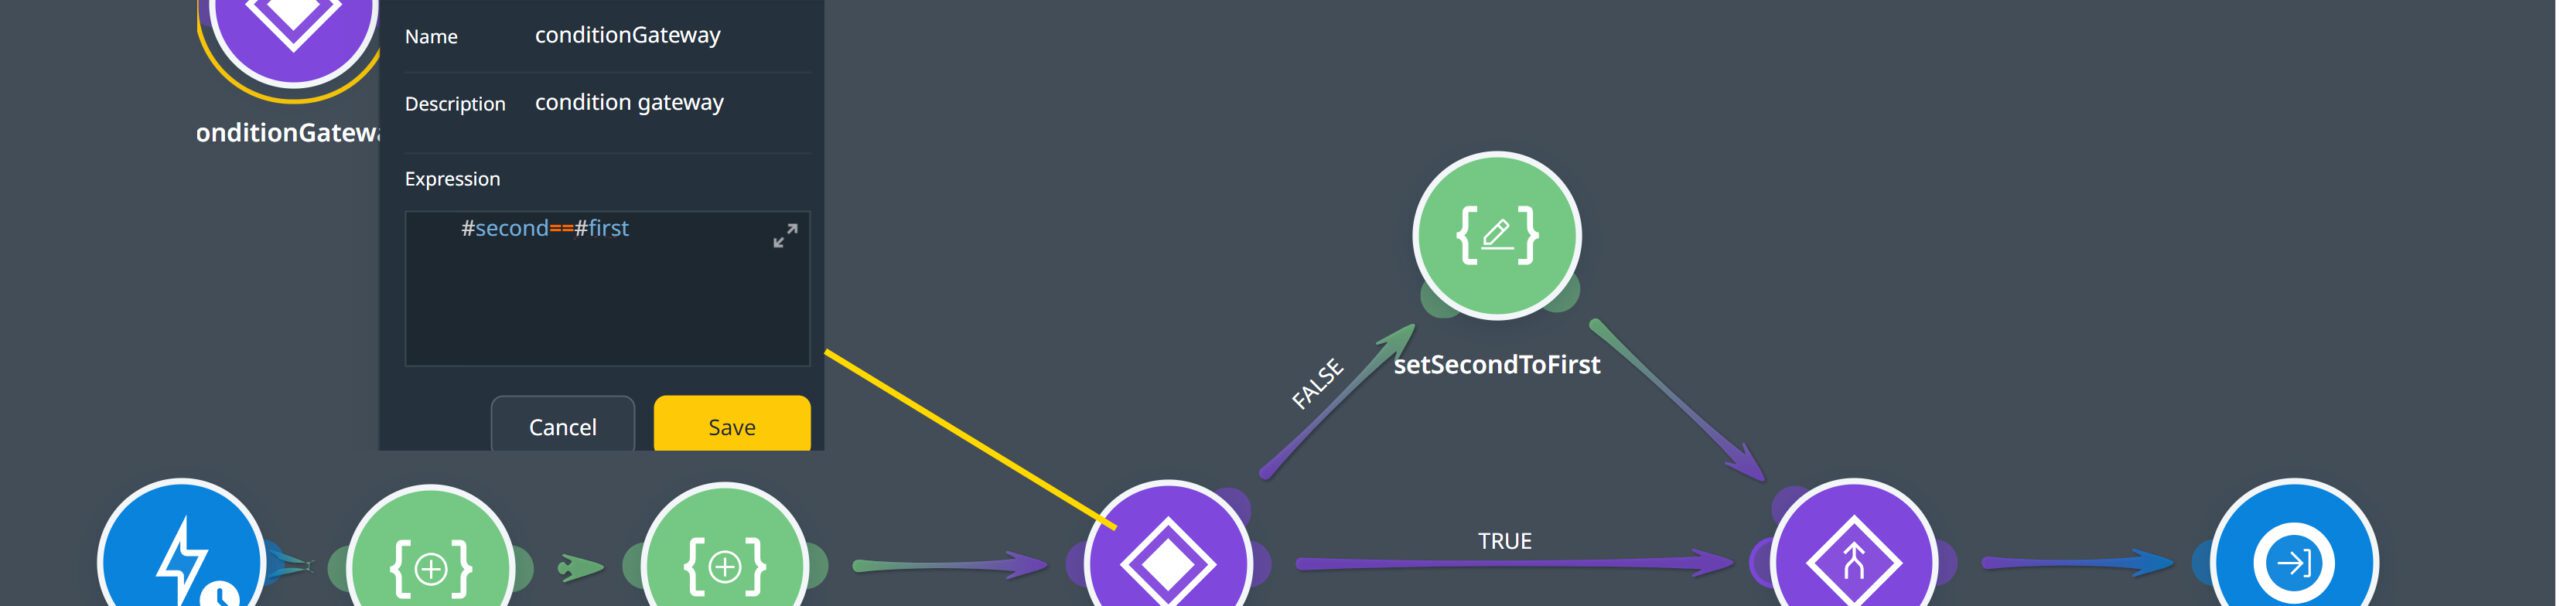
In the flow, we set variables first to 5 and second to 6 (both are int types), so the expression result will be false.
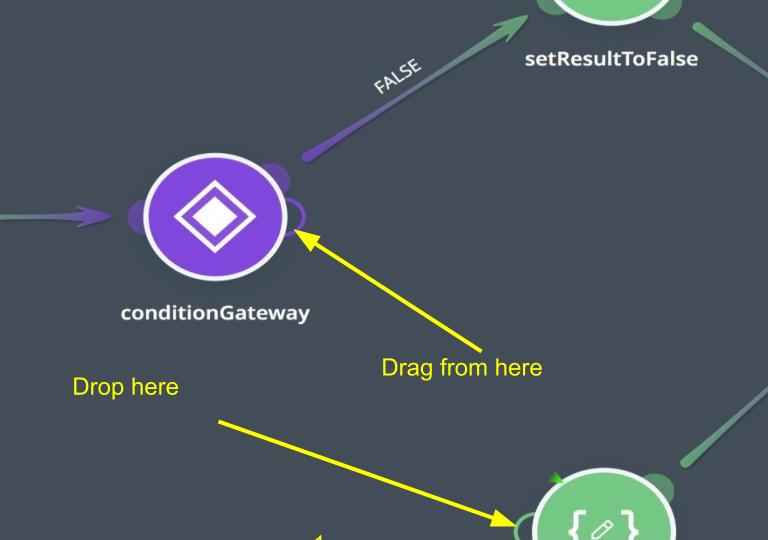
From the Condition Gateway, we have two execution paths; the first is created for a ‘false’ result when you drop the condition gateway on the existing connection line. The second should be dragged from the outlined ‘ear’ to the next activity on the ‘true’ connection line.
In the flow above, you can see the Condition Gateway with the two execution paths.
Merge Gateway #
When the execution flow splits because of a Gateway, it must be merged before the flow execution is finished at the end event.
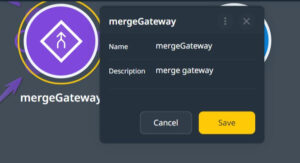
The merge gateway has multiple entry points (unlimited) and a single output point. Its definition includes a name (for the activity) and a description.
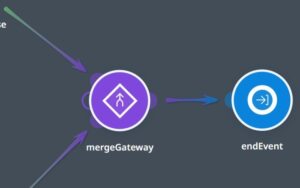
Note the empty ‘ear’ for connecting a new connection line (execution path); once it is used, a new one will be created.
Enum Gateway #
This gateway determines the execution path based on the value of a variable set to an Enum type. An enum is defined with a finite set of discrete values.
For instance, in a Gender enum, you can define the values as Male, Female, and Other.
In Wizzdi, Cloud, Enums are defined in the Entity Editor, and in Java, code is added in dependencies.
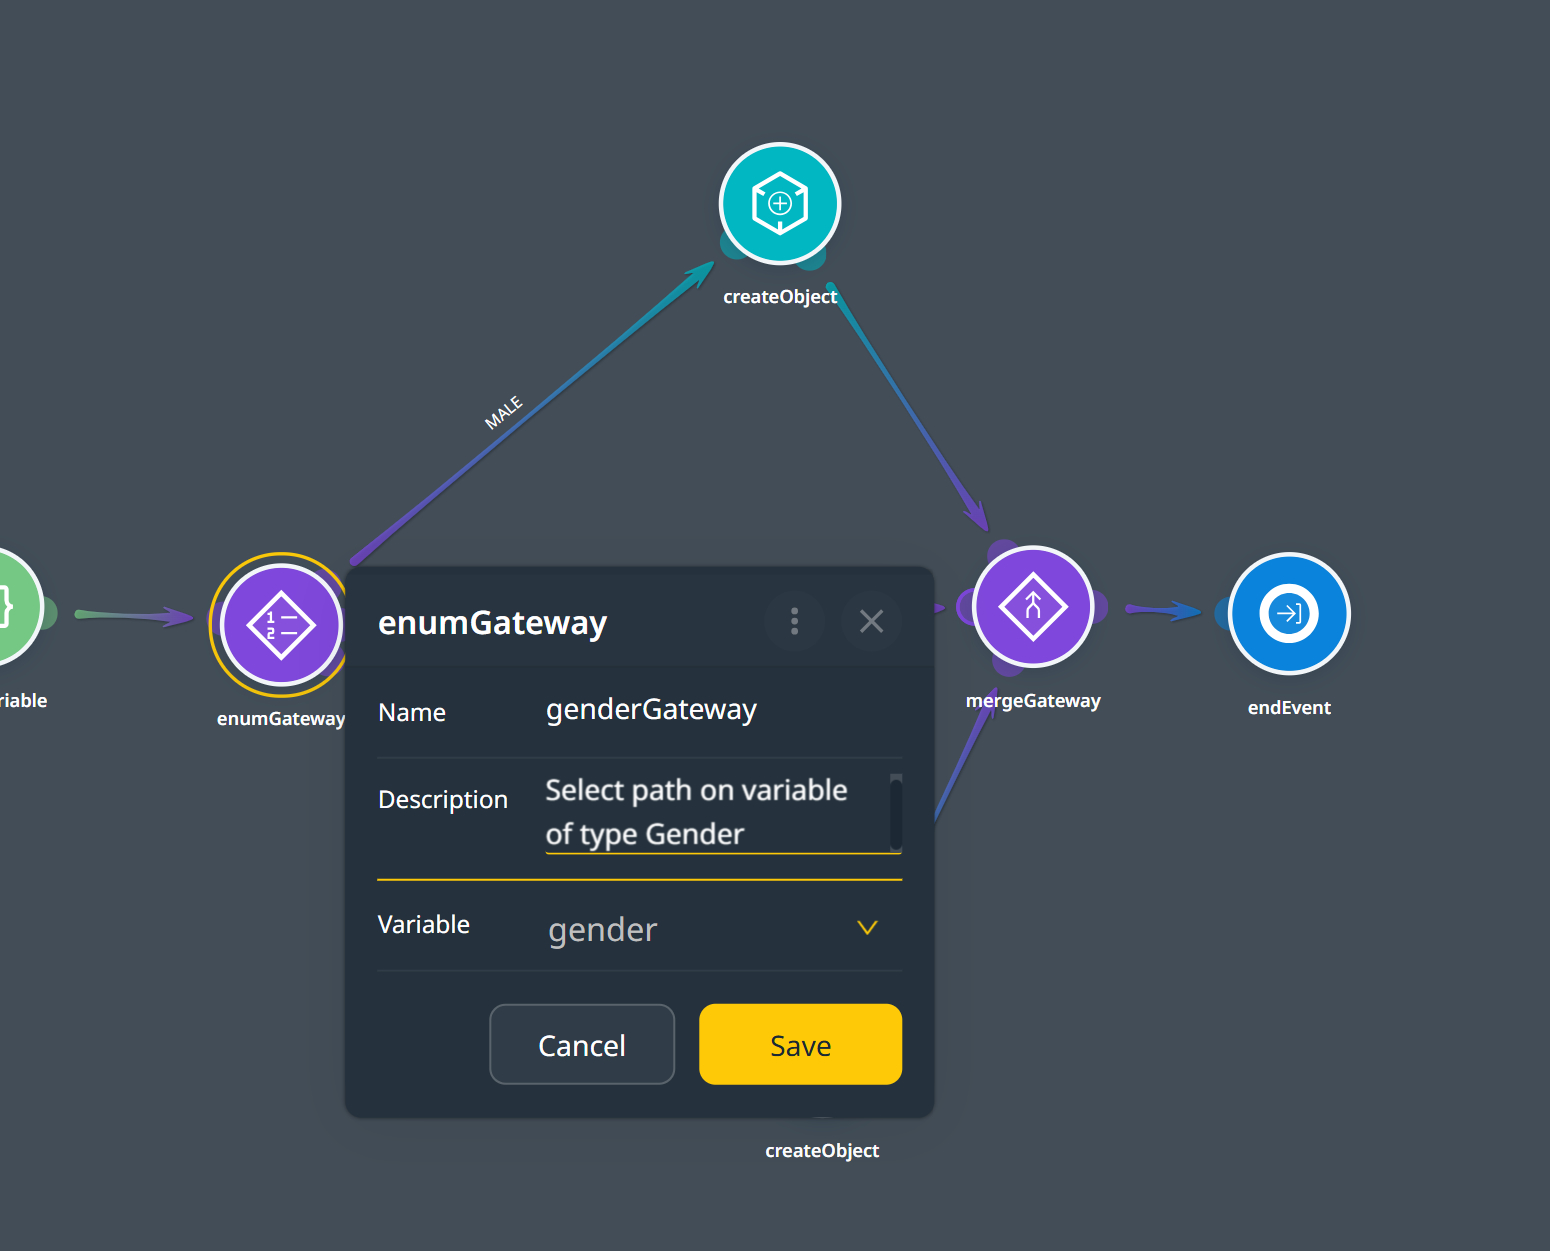
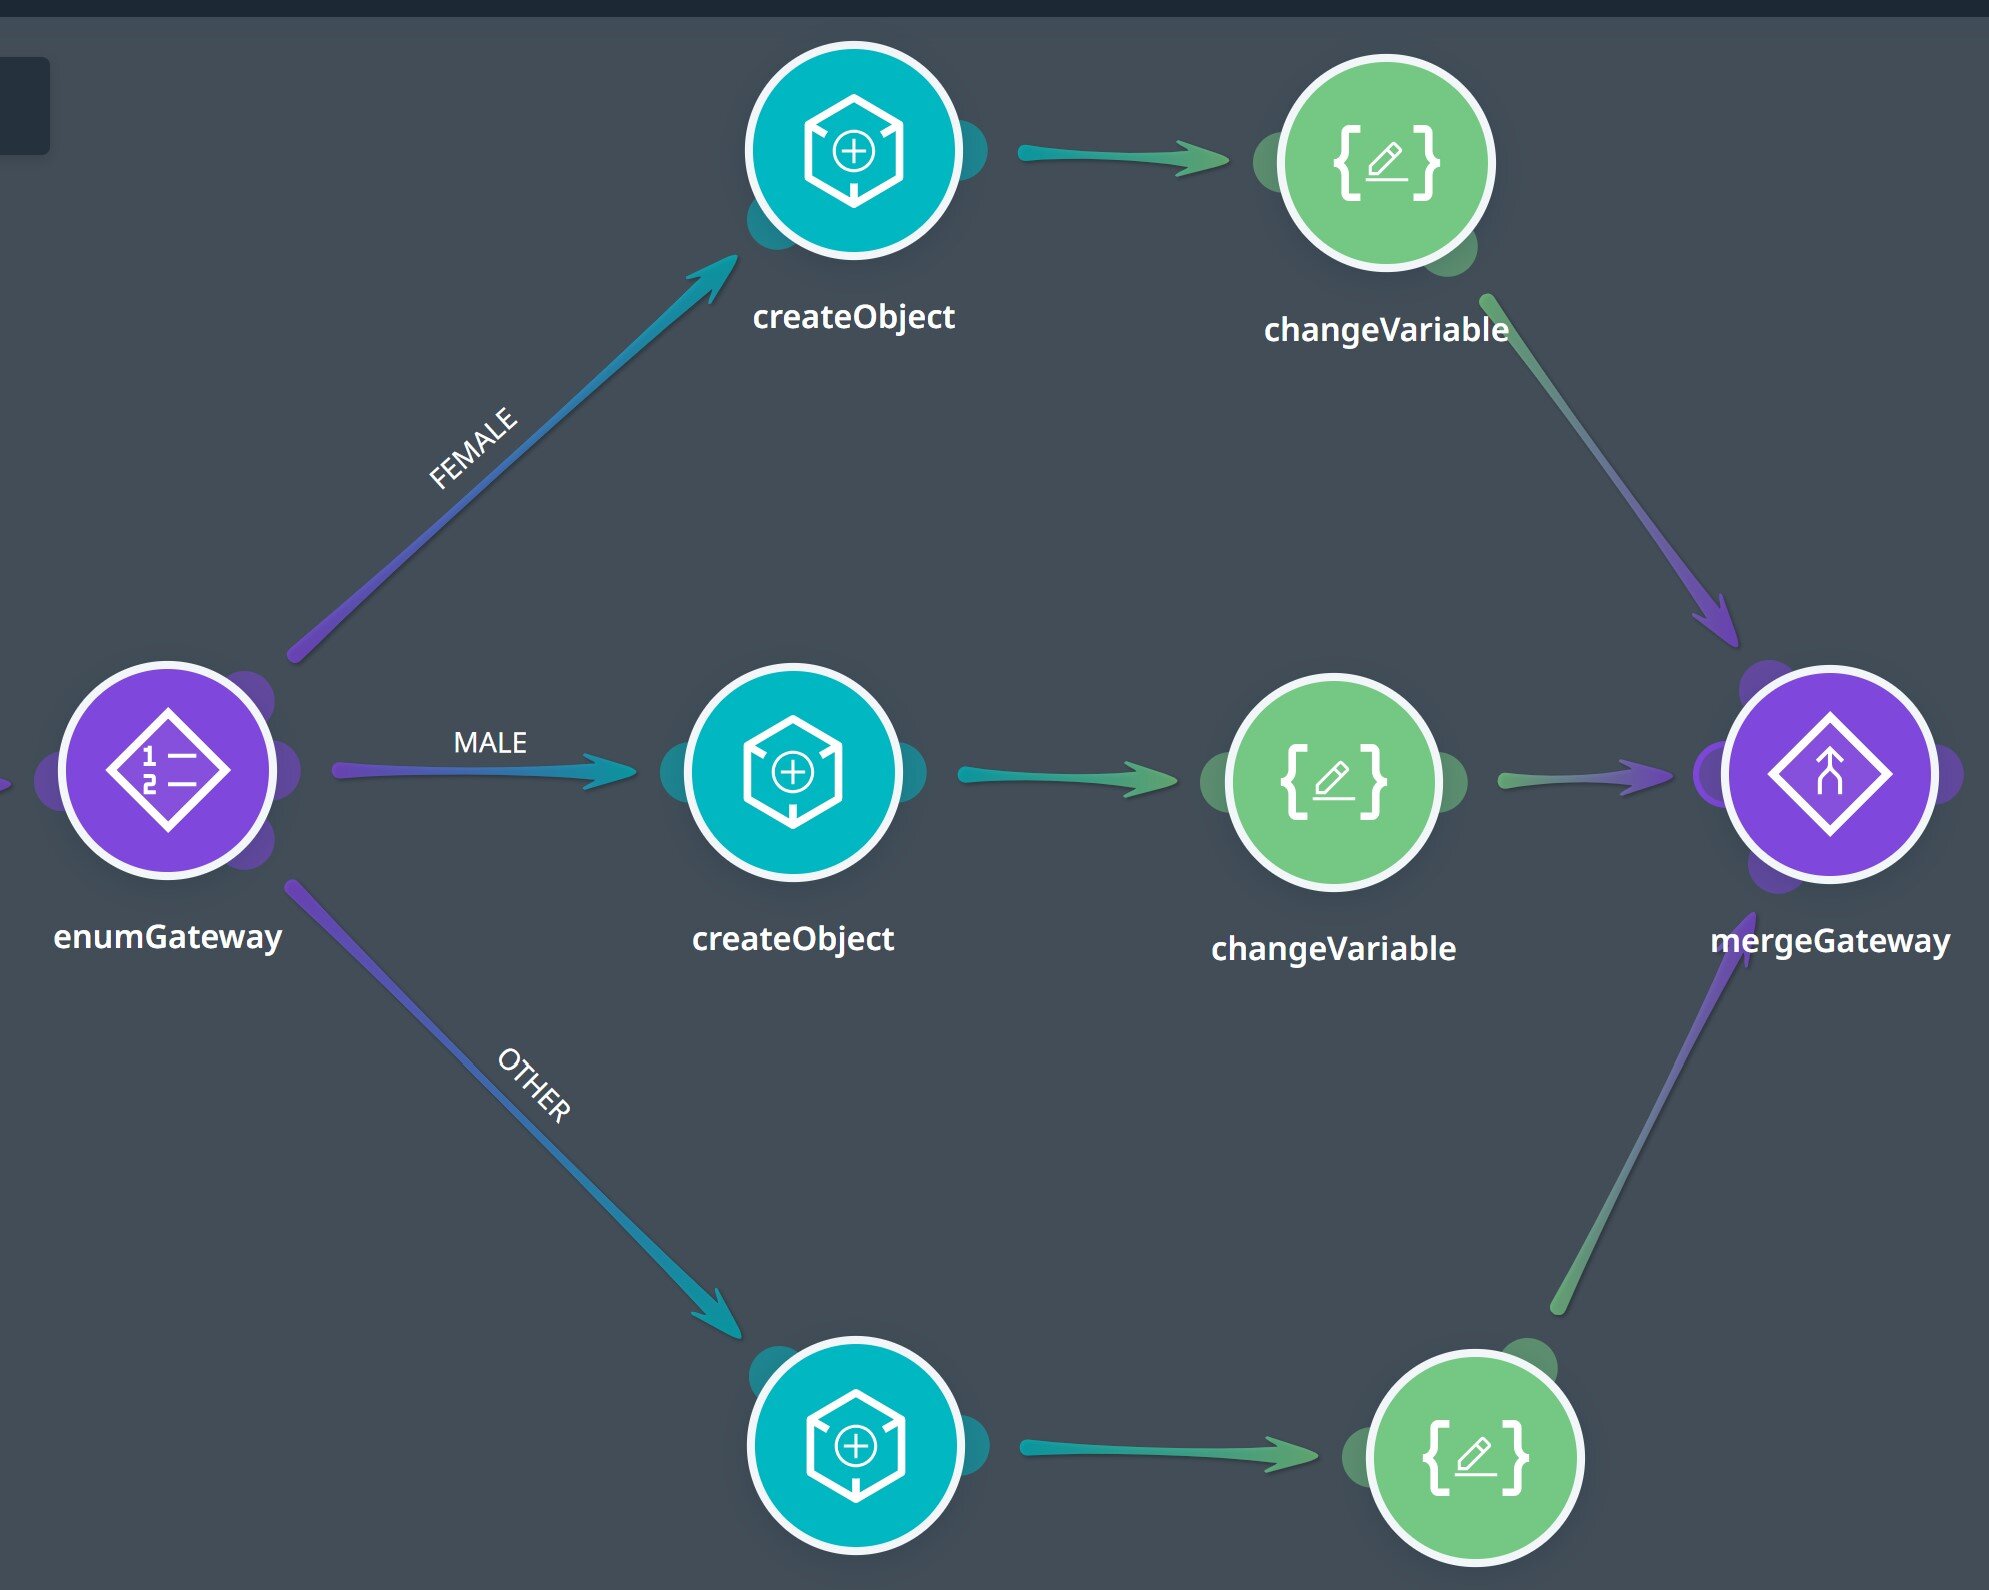
When you add the Enum Gateway activity to an execution path, it links the first enum value to the path that connects the gateway to the next activity. You can then add additional activities to the canvas and connect the free “ear” of the gateway to each activity you have placed on the canvas.
The number of such activities should match the number of values in the Enum. All execution paths must eventually end on a merge Gateway. You can add as many as required additional activities on each path.
Type Enum #
The Type Gateway receives a single variable and provides multiple execution paths based on the number of extenders for this type.
Example:
The Teacher, Student, and Principal extend entity Person.
When a variable of Object Type Person is used in a TypeEnum activity, it provides three execution paths for each Teacher, Student, and Principal.
All execution paths must end at the same mergeGateway.
Java code #
When developing an app in Wizzdi Cloud, a hybrid approach can be utilized. This allows users to combine the drag-and-drop interface of Wizzdi Cloud with coding.
Coding can be done inside the flow editor or using your favorite IDE (Integrated Development Environment), such as IntelliJ, Netbeans, or Eclipse.
When developers use an external IDE to add code to the code generated by Wizzdi Cloud, they apply their changes to the master branch that Wizzdi Cloud has pushed to your designated repository on GitHub or a similar platform. When the next commit is initiated from Wizzdi Cloud, the system merges the changes from the master branch into the master branch and the generated branch. So, after the merge, changes from the external IDE and changes from the Wizzdi Cloud system are available on both branches.
Wizzdi Java code support includes two activities:
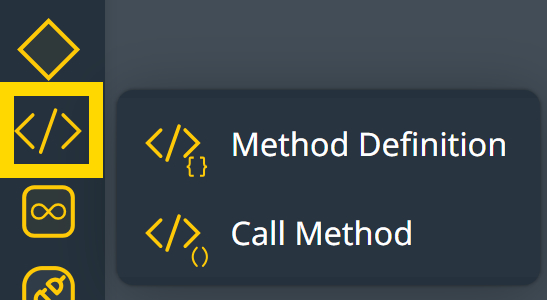
Method Definition #
This icon is never placed on an execution line; it should be dropped on any free area. Multiple method definitions can reside in the same flow.
Method Definition Dialog #
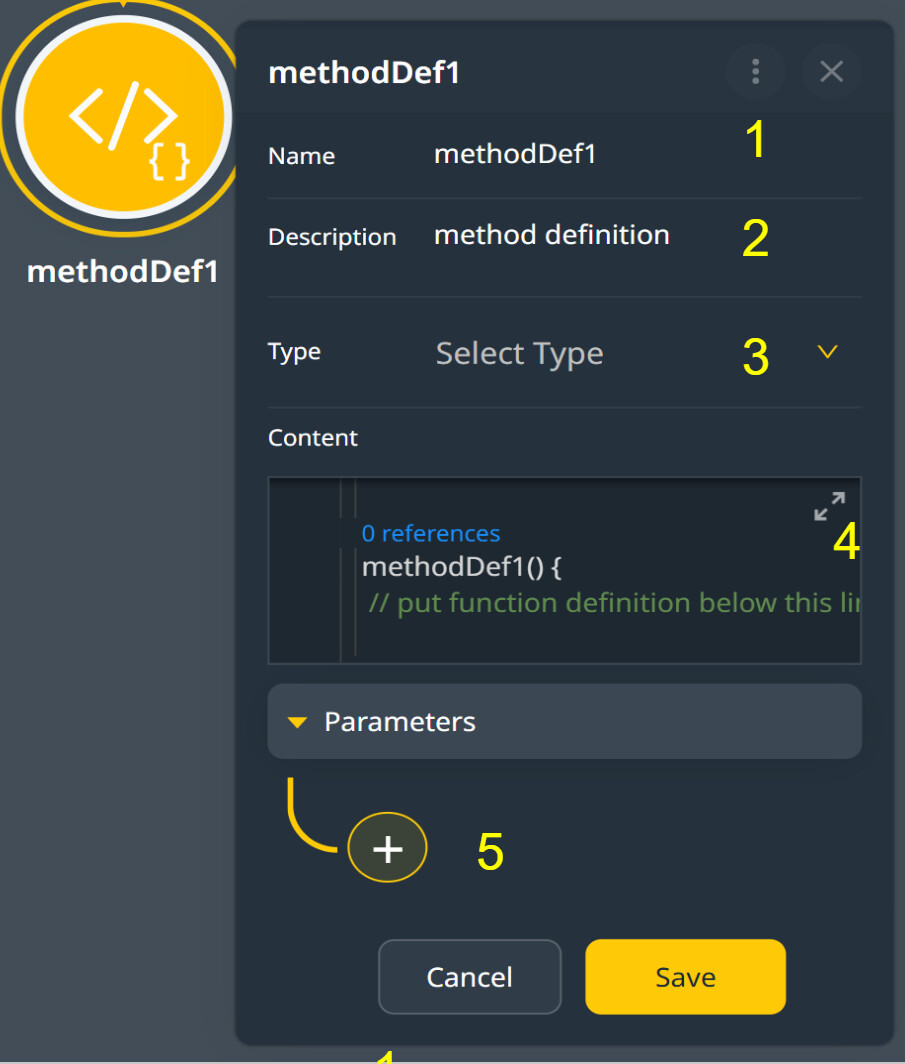
Legend
- Method name. This must be a legal Java method name, cannot start with a capital letter or a number, no spaces, and some special characters must be omitted.
- Method description, this is the documentation of the method.
- Method return type: this can be any Java class or primitive type. This includes List<E> and Map<K, E>.
- Method Editor: use the two-arrow tool to expand; pane the work area in any direction to place the editor area at the center.
- Parameters’ definition. Add parameters to the method. The name, the parameters, and the return value define the method’s signature.
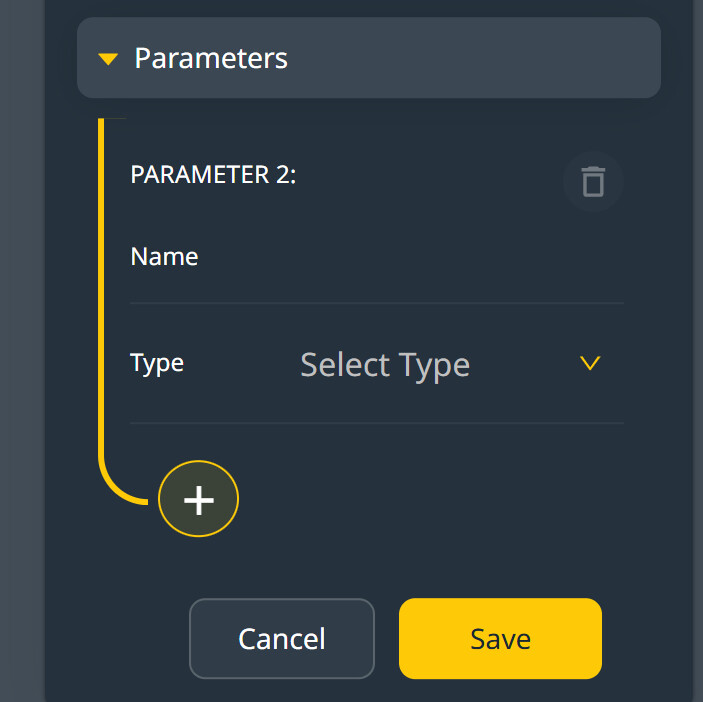
Parameters #
To add parameters, click on the plus sign and define the name and the type of each parameter as in the image below:
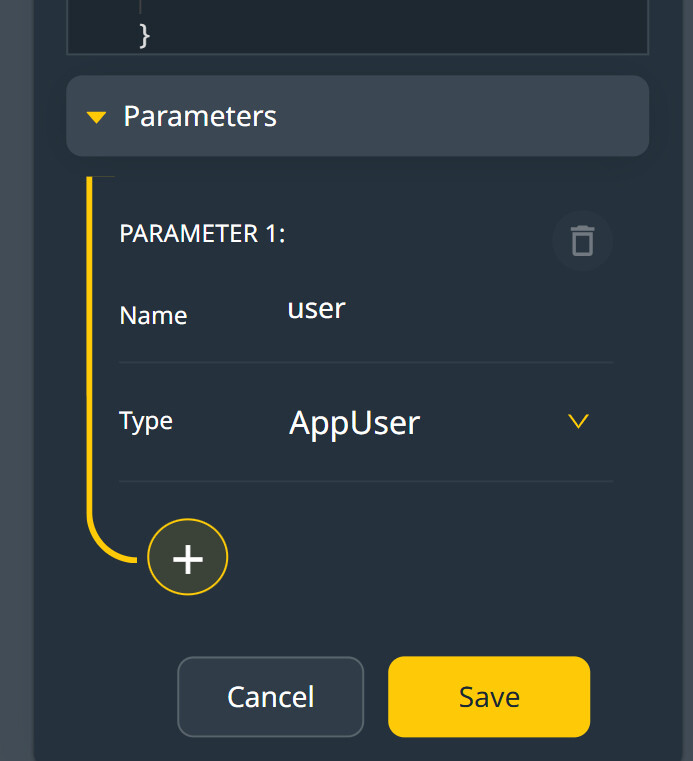
Editing a Method #
Loops #
![]()
Create loops across a list of elements or for a fixed number of times; loops are visual containers hosting other icons (activities), including nested loops.
To create a loop, drag the loop icon on a connection line or onto a diagram space and manually connect it to upstream and downstream activities.
Inside the loop
The activities inside the loop represent what one iteration should do; the structure should be similar to any flow structure. The loop has one entry point and one exit point.
The break and continue events are provided to allow exiting the loop or starting a new iteration without finishing the current one.
Loop types #
There are two types of loops: a “for loop” and a “loop over collection.”,
- For Loop:
- This is typically used for executing a set of actions a fixed number of times. The for loop might represent a process that needs to repeat certain steps a predetermined number of times. For example, if a task needs to be performed daily for a week, the for loop could iterate seven times.
- Loop Over Collection:
- This loop iterates over a collection of items, such as a list. This could represent a process where each item in a collection must undergo the same actions. For instance, if you have a list of teacher records that each need to be processed similarly, a loop over collection would be used to iterate through these records.
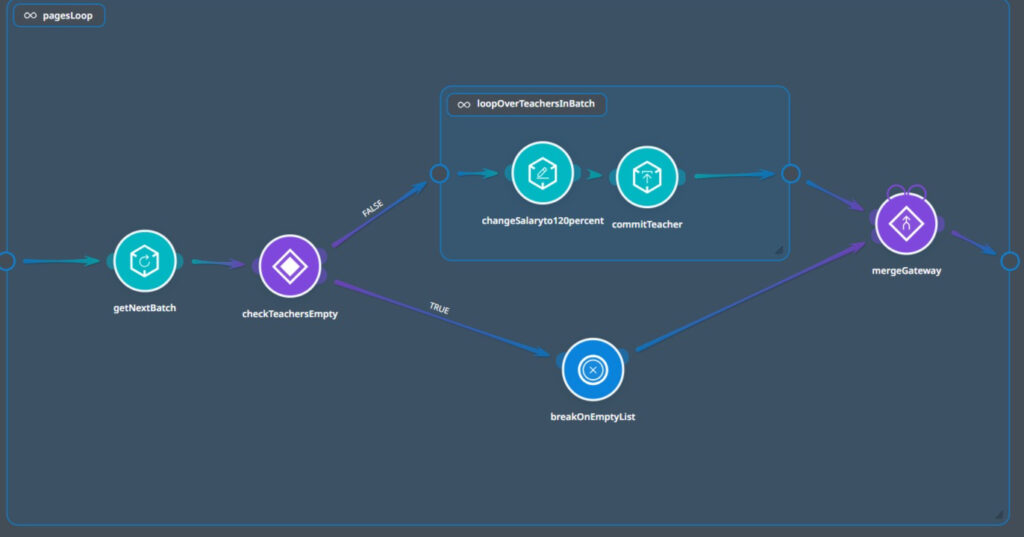
Example #
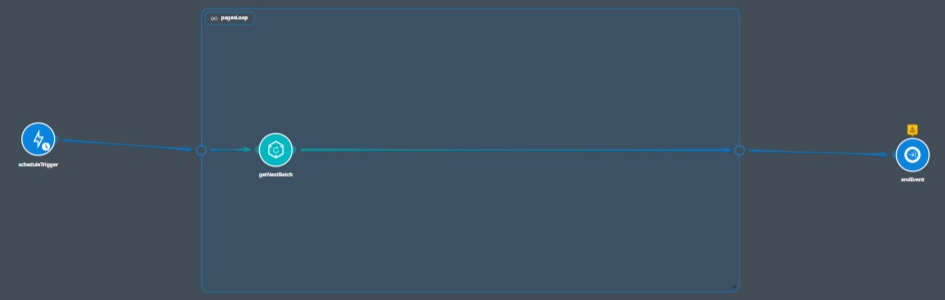
Loops Example
The example above depicts some points:
- It retrieves an unknown number of Teacher items from the database in a preferred paged manner.
- It demonstrates how loops can be nested.
- It uses the two types of loops.
Step 1
Drag the loop icon on a connection line.
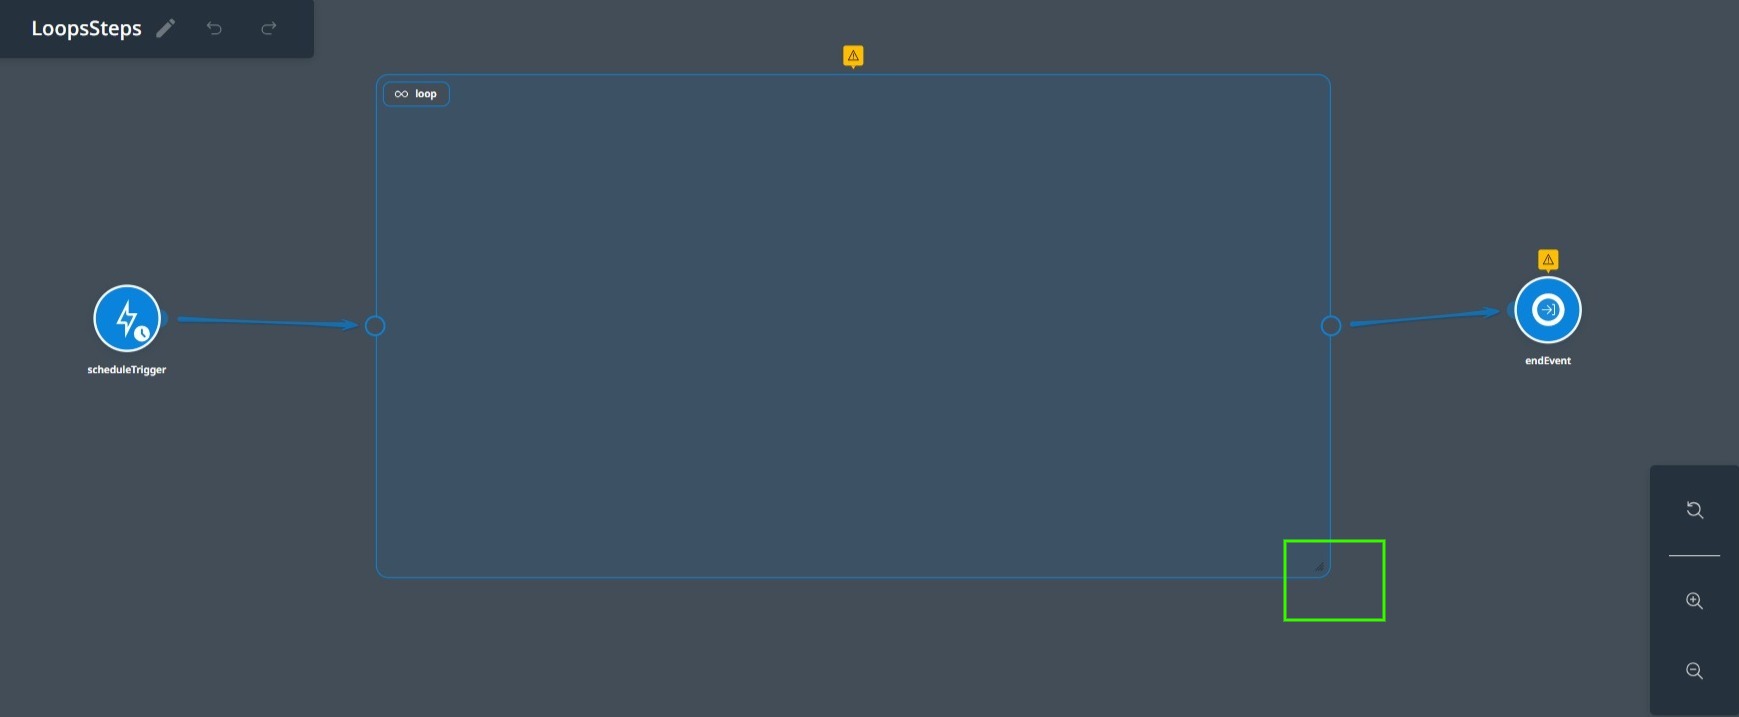
Drag the bottom right corner of the loop to adjust its size. The yellow flag indicates that the Loop is not yet defined.

‘For loop’ type defined.
The loop above is defined as follows:
- The variable name for the loop is currentPage. We need this loop to control teacher records (entities) fetching.
- The Init value is 0; we start with page 0.
- The condition value is set to true. This is because we do not know how many pages will be present. We will exit the loop when the current batch of teacher records is empty. See below.
- The increment value is 100, which is our choice for a batch size. Too large a batch size will strain our resources, and too small is inefficient.
Step 2
The next step is to drag a Retrieve Object activity inside and to the left side of the loop. It will auto-connect to the loop entry point.
Click on the activity to edit it.
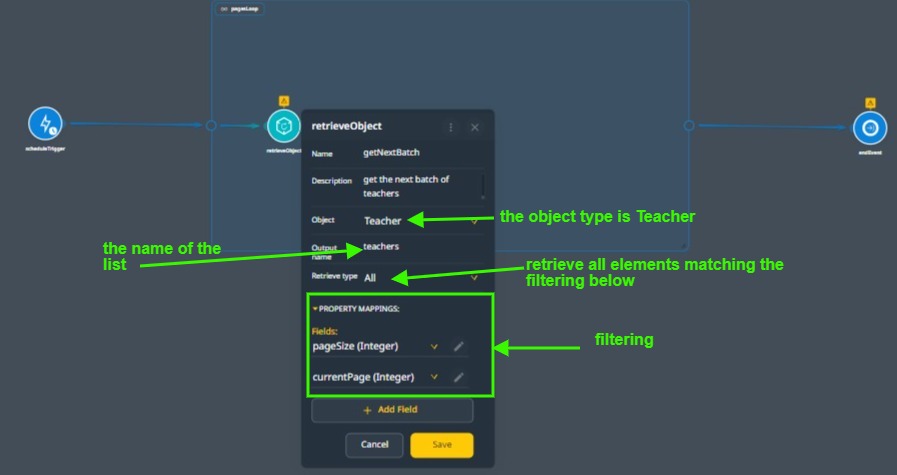
The Object Retrieve activity to get a batch of teachers.
Setting the retrieve Object correctly is critical as we do not want to fetch all Teacher records in one batch.
- Set the object type to Teacher.
- Set the output name to teachers. This will be a List of Teacher types per batch.
- Set the Retrieve Type to all; we will get all teachers available filtered by the Property Mappings.
- Set the Property Mappings as follows:
- Click on Add Field and select the currentPage field. The system created this field for the Teacher entity to allow paged access to the Teacher entity.
- Set the field value to the currentPage variable set on the main loop. Save changes.

- Click on the Add Field again. Now select the pageSize field and set it to 100.
Note: The currentPage field in the Retrieve Object activity gets its value every loop from the currentPage ‘For Loop’ control variable; we have set the ‘For Loop’ currentPage variable to increment by 100 every loop, hence the setting of 100 for the pageSize field of the Retrieve Object activity.
Step 3
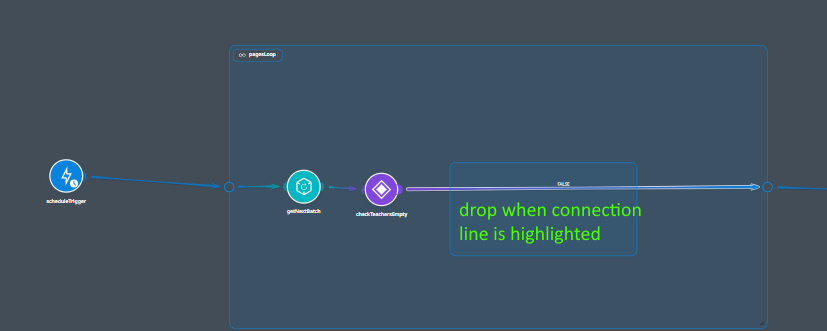
Connect the Retrieve Object activity’s exit ‘ear’ to the loop’s exit point.
Connection Line inside the loop
Step 4
Drop a Condition Gateway on the line connecting the Retrieve object Activity and the loop exit.
The gateway checks if the last Retrieve Object execution has returned an empty list; this is the condition for exiting the main loop.
![]()
Click on the gateway and set it to check if the teachers’ list is empty.
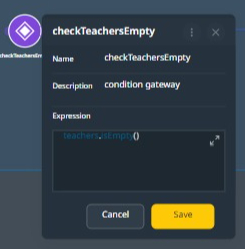
Gateway Setting
Step 5
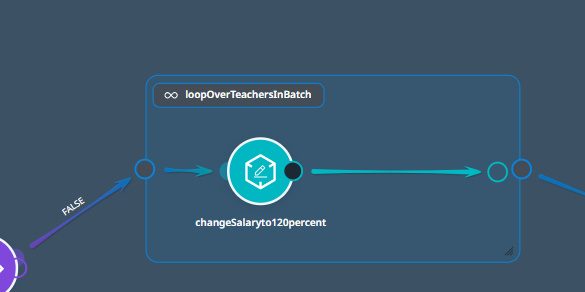
When the teachers’ list is not empty, we want to process the items individually and increase each teacher’s salary by 20 percent.
We need to drag and drop a new loop inside the main loop; this loop processes each batch if it is not empty.
Drop inner loop
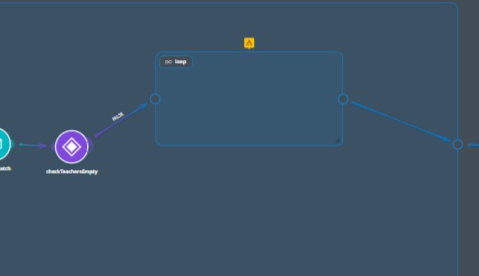
Inner loop dropped
The inner loop is now ‘yellow flagged,’ indicating that we must define it properly.
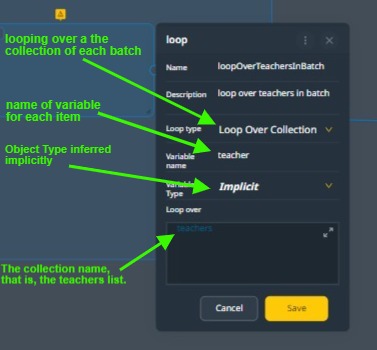
- The inner loop type is Loop Over Collection, and the collection is the currently fetched batch from the database.
- When such a loop iterates, every item is fetched from the collection into a variable. We need to define this variable’s name to reference it inside the loop. The name selected here is ‘teacher’.
- The type of ‘teacher’ needs no definition as the type of each item is known; it is the type of the collection. So, the system implicitly infers the type.
- Lastly, we must type the collection’s name to iterate over, which is the name given to the collection in the retrieve Object activity. That is, ‘teachers’.
Step 6
Drag a Change Object activity and place it inside the inner loop as follows:

Set the activity parameters as follows.
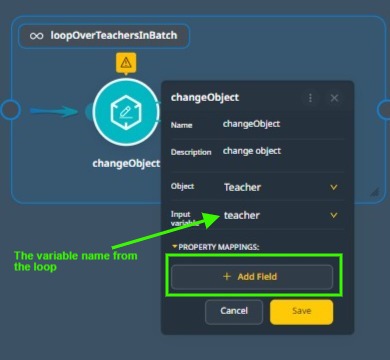
Although the type of teacher is known in runtime, we need the Object Type to be set to Teacher so the property mappings correctly reflect a teacher’s fields.
We now must select the field we want to change in the teacher variable.
Click on the ‘+Add Field‘ and select the salary field.
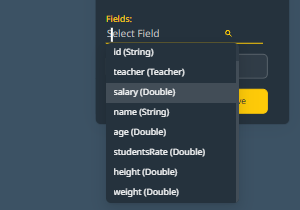
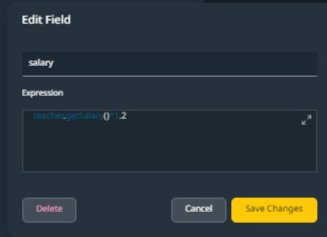
Set the salary to a new value. This will be the current value*1.2.
Step 7
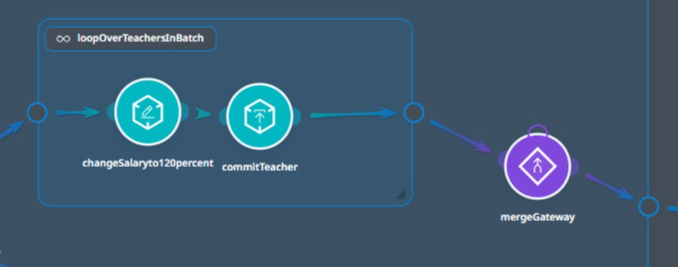
Connect the right ‘ear’ of the Change Object Activity to the inner loop exit.
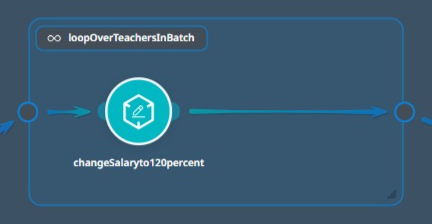
Connection line connected to inner loop exit.
It is important to note that when an object is modified in a Change Object activity, the changes will not be reflected in the database until they are committed. A Commit Object Activity should be added inside the inner loop to ensure that the changes are saved.
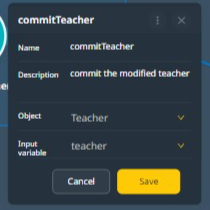
The commit object is filled with the Object Type Teacher and the variable ‘teacher’.
The Commit Object activity is straightforward and requires both the variable and the object type.
Step 8
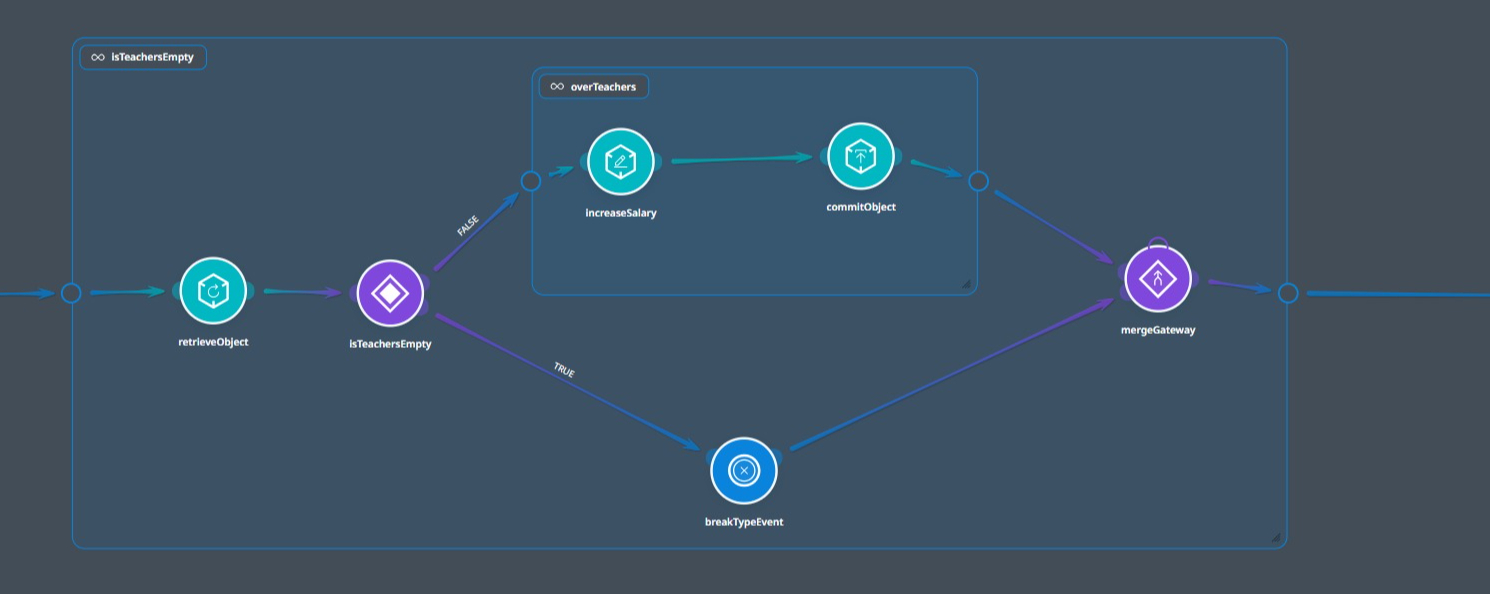
We need to define the actions taken when there are no additional Teacher items and the Gateway Condition evaluates to true.
In such a case, we need the main loop to exit, this is achieved by the Break Event.
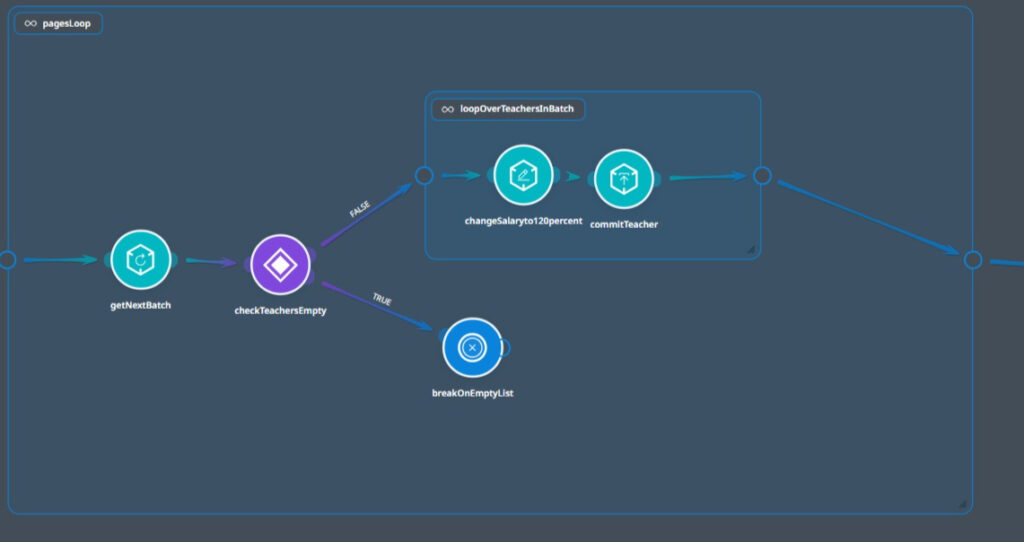
The two paths from the Condition Gateway must merge before exiting the outer loop. We’ll use a Merge Gateway on the connection line from the inner loop to the outer loop exit.
Step 9
The ‘true’ path should also end in the same Merge Gateway, so we connect the right ‘ear’ of the Break Event’ to an empty ‘ear’ on the Merge Gateway.
The final example looks like this.
Predefined Consumed APIs #
You can access external service providers from here; these include built-in services (like Google’s) or consumed APIs defined in the Consumed Apis section.
Fire Events #

Fire an event from one flow, potentially notifying another flow. Events are processed synchronously and pass an Object to the receiving Flow.
The same event can trigger multiple flows.
Integrations Activities #
See below a discussion about Integrations. These are software components available on the Wizzdi cloud. Once added to an App, integrations may add additional activities to the left side menu of any App flow. For Example, the WebSocket integration adds these activities:

Appendixes #
Spel FAQ #
Basic Operations #
Q: How do I concatenate two strings?
A: Use the .concat() method
"Hello".concat("World")
Q: How do I check if two strings are equal?
A: Use the .equals() method:
"apple".equals("banana")
Q: How do I convert a string to uppercase?
A: Use the .toUpperCase() method:
"hello".toUpperCase()
Working with Variables #
Q: How do I assign a value to a variable?
A: If supported, typically, variables are set outside the expression using activities and used inside the expression:
#variable = 20
(Note: Check if direct assignment is possible in your Wizzdi environment or if variables need to be pre-defined externally.)
Q: How do I use a variable in an expression?
A: Reference the variable directly:
#myVariable + 10
Type Instantiation and Methods #
Q: How do I create an instance of a class?
A: Use the new operator:
new java.util.Date()
Q: How do I call a static method?
A: Use the T() operator:
T(java.lang.Math).max(5, 10)
Collections #
Q: How do I access an element in a list?
A: Use index access:
myList[0]
Q: How do I modify an element in a list?
A: If modification is supported:
myList[0] = 'newValue'
Q: How do I filter elements in a list?
A: Use the selection (?) operator:
myList.?[#this > 10]
Logical Operations #
Q: How do I perform a logical ‘AND’ operation?
A: Use the and keyword:
#isActive and #hasAccess
Q: How do I use the ternary operator for conditional checks?
A: Use the ?: syntax:y code
#age >= 18 ? 'Adult' : 'Minor'
Advanced String Operations #
Q: How do I check if a string contains a substring?
A: Use the .contains() method:
"Hello World".contains("World")
Q: How do I replace part of a string?
A: Use the .replace() method:
"Hello World".replace("World", "Everyone")
Time and Date #
Q: How do I get the current date and time?
A: Use the Static now method on the OffSetDateTime class
T(java.time.OffsetDateTime).now()
A: Instantiate An OffSetDateTime from a String:
Numerical Operations #
Q: How do I perform arithmetic operations?
A: Directly use arithmetic operators:
10 + 5 * 3 / 2 - 1